A Simple Way to Make Perfect Crispy Pork Belly
Crispy pork belly is one of those meals that looks impressive but is surprisingly easy once you understand the process. The combination of juicy meat, rendered fat, and crunchy crackling creates a dish that is satisfying enough for a family dinner yet special enough to serve when guests visit. The air fryer makes the entire process much simpler because it cooks evenly, shortens the cooking time, and produces beautifully crisp skin without the lengthy preparation that traditional methods usually require.
Instead of spending a day drying the pork in the refrigerator or constantly watching it under a hot grill, this method uses a salt crust to remove moisture from the skin before increasing the temperature for the final roast. The result is crisp crackling with tender, flavorful meat underneath.
The seasoning is intentionally simple. Garlic powder, sugar, salt, and Chinese five-spice work together to enhance the natural richness of pork belly without overpowering it. Every bite has a balance of savory flavor, gentle sweetness, and aromatic spices while allowing the pork itself to remain the highlight.
Why This Method Works
- Cooking pork belly successfully comes down to two things: rendering the fat slowly and creating dry skin before finishing with high heat. The air fryer is excellent at both.
- The first stage cooks the pork gently at a lower temperature. During this time, the meat begins to cook through while the fat slowly softens and renders. At the same time, the layer of salt placed over the skin draws out excess moisture. Dry skin is essential because moisture prevents the crackling from becoming crisp.
- Once the salt crust is removed, the skin is lightly brushed with oil before the temperature is increased. The hotter cooking stage finishes roasting the meat while transforming the dry skin into golden, crunchy crackling.
- Because the air fryer circulates hot air around the pork, browning happens evenly, helping the skin puff and crisp across the surface.
Choosing the Right Pork Belly
- The quality of the pork belly has a big impact on the finished dish. Look for a boneless piece with the skin still attached. An even thickness allows the meat to cook consistently from one end to the other.
- A balanced ratio of meat and fat is also important. Too much fat can make the slices greasy, while too little fat can reduce the tenderness. A center-cut piece usually offers the best balance and cooks more evenly.
- Before seasoning, check that the skin is smooth and free from excess moisture. Pat it completely dry using paper towels. This small step helps produce much crispier crackling later.
Preparing the Pork
- The first preparation step is piercing the skin. Using a metal skewer or another sharp tool, make small holes all over the rind without piercing into the meat underneath.
- These tiny holes allow the rendered fat to escape during cooking. As the fat rises through the skin, it effectively fries the surface from within, producing the characteristic bubbly, crispy crackling.
- Take your time during this step because evenly distributed holes help create evenly crisp skin.
- Once the skin has been prepared, turn the pork over so the meat faces upward. This keeps the skin clean while seasoning only the meat.
Seasoning the Meat
- The seasoning mixture contains only a handful of ingredients, yet each has an important role.
- Fine salt enhances the natural flavor of the pork.
- Sugar balances the savory richness while encouraging gentle caramelization around the edges.
- Garlic powder adds a mild savory depth that complements pork perfectly.
- Chinese five-spice powder contributes warm aromatic notes that pair beautifully with roasted meat.
- Mix everything together thoroughly before rubbing it evenly over every exposed part of the meat. Avoid getting the seasoning onto the skin because spices may burn during the high-heat roasting stage and prevent the crackling from developing evenly.
- If the pork has been cut into two smaller sections, season every side carefully before placing both pieces back together into their original shape.
Building the Salt Crust
- A sheet of aluminum foil forms a shallow tray around the pork belly. Fold the edges upward so they sit slightly higher than the meat. This keeps the salt in place throughout the first cooking stage.
- Brush the skin with white vinegar. The vinegar helps prepare the surface before the salt is added and assists with drying the skin.
- Cover the entire rind with a generous layer of fine salt. The salt should completely hide the skin underneath, forming an even blanket across the top.
- Allow the pork to rest for about five minutes before cooking. During this short time, the salt immediately begins drawing moisture from the skin.
- This moisture removal is one of the biggest secrets behind exceptionally crispy crackling.
The First Cook
- Transfer the prepared pork carefully into the air fryer basket.
- Cooking begins at a low temperature of 120°C (248°F) for about thirty minutes. This gentle heat allows the meat to start cooking while giving the salt enough time to absorb moisture.
- By the end of this stage, the salt should have formed a firm crust over the skin. If it still looks loose or grainy, continue cooking for another five minutes until it hardens.
- Once ready, lift away the hardened salt crust and brush away any remaining salt using kitchen paper. The skin should now feel noticeably drier than before, creating the perfect surface for the final roasting stage.
Preparing for the Final Roast
- Once the salt crust has been removed, discard both the salt and the foil. Wipe away any remaining grains of salt from the skin and the sides of the pork using kitchen paper. This step is important because leftover salt can make the finished pork overly salty.
- Return the pork belly directly to the air fryer basket with the skin facing upward. Brush the rind with a thin, even layer of vegetable oil. Only a small amount is needed, as the pork will naturally release more fat while roasting.
- The oil encourages even browning and helps the crackling develop an attractive golden color. Since the skin has already been dried during the first cooking stage, it is now ready for higher heat.
Roasting Until Crispy
- Increase the air fryer temperature to 200°C (392°F) and cook the pork belly for 30 to 40 minutes.
- During this stage, the meat becomes fully cooked while the fat continues to render. The skin slowly transforms from pale to golden brown before puffing into crisp crackling.
- Every air fryer cooks a little differently, so begin checking the pork after about twenty minutes. If one section browns more quickly than another, cover that area loosely with a small piece of foil while allowing the remaining skin to continue crisping.
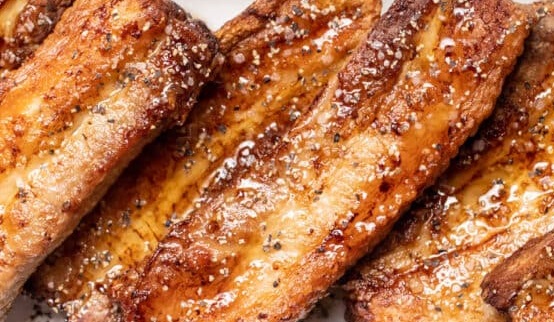
- The finished pork should have deep golden crackling that feels hard and crisp when lightly tapped. The meat underneath should remain juicy and tender without becoming dry.
Let the Meat Rest
- As tempting as it is to slice immediately, resting the pork is one of the most important steps.
- Transfer the cooked pork belly to a wooden cutting board and leave it undisturbed for about 15 minutes.
- During this time, the juices settle back into the meat instead of running out onto the board. Resting also makes slicing easier because the meat firms slightly while staying moist.
- Skipping this step often results in drier slices, so giving the pork a few extra minutes is well worth the wait.
Slicing Without Breaking the Crackling
- The crispy skin can be quite firm, so using the right technique makes cutting much easier.
- Turn the pork belly upside down so the meat faces upward and the crackling rests against the cutting board.
- Using a very sharp knife, slice carefully through the meat first. Once the blade reaches the crispy skin, apply firm, steady pressure with both hands to push through the crackling in one movement.
- This method helps keep the crackling attached to every slice while producing neat portions.
Serving Suggestions
Freshly cooked crispy pork belly is incredibly versatile.
- Serve it alongside steamed rice and simple vegetables for an easy dinner, or pair it with vermicelli noodles, crisp lettuce, cucumber, herbs, and dipping sauce for a lighter meal.
- It is also excellent wrapped in rice paper with fresh herbs and noodles for a meal that combines crunchy, fresh, and savory textures.
- The leftovers are equally delicious. Thin slices can be reheated in the air fryer until the crackling becomes crisp again before adding them to rice bowls, noodle dishes, or salads.
Tips for Consistently Crispy Skin
- Small details make a noticeable difference when preparing pork belly.
- Always choose a piece that has an even thickness. Uniform meat cooks more evenly and produces consistent crackling from one end to the other.
- Pierce only the skin. Avoid pushing the skewer into the meat, as this can allow juices to reach the surface and soften the crackling.
- Dry the skin thoroughly before adding vinegar and salt. Even small amounts of moisture can reduce crispness.
- The salt layer should completely cover the skin during the first cooking stage. It removes moisture rather than seasoning the meat, so don’t be tempted to use less.
- A paper liner placed beneath the air fryer basket—not inside it—helps catch rendered fat, making cleanup much easier without affecting air circulation.
Preparing Ahead
- Although this recipe can be completed in about an hour and fifteen minutes, it also works well as a make-ahead meal.
- The day before cooking, pierce the skin, apply the seasoning to the meat, and leave the pork uncovered in the refrigerator overnight.
- This extra time allows the seasoning to penetrate the meat while the skin dries naturally. When you’re ready to cook, simply continue with the salt bake and roasting steps.
- This little bit of advance preparation often produces even crispier crackling and deeper flavor.
Common Mistakes to Avoid
- One of the biggest mistakes is leaving moisture on the skin. Drying the rind carefully before cooking is essential.
- Applying seasoning directly to the skin is another common error. Spices can burn during roasting and interfere with even crackling, so keep all seasoning on the meat side only.
- Cooking at high temperature from the beginning is also not recommended. The lower initial temperature gives the fat time to render before the final blast of heat crisps the skin.
- Finally, avoid slicing immediately after cooking. Resting the pork keeps the meat juicy and makes cleaner slices.
Air Fryer, pork belly strips
This air fryer crispy pork belly features tender, juicy meat topped with irresistibly crunchy crackling. A simple seasoning blend flavors the pork while a salt bake helps dry the skin for consistently crisp results. The two-stage cooking method creates evenly cooked pork with golden, crunchy crackling without the lengthy preparation of traditional roasting.
4
servings15
minutes1
hour592
kcal1
hour15
minutesIngredients
1 kg (2.2 lb) pork belly, with rind
1 teaspoon fine salt
1 teaspoon sugar
1 teaspoon garlic powder
1 teaspoon Chinese five spice powder
15 ml (1 tablespoon) white vinegar
180 g (½ cup) fine salt
15 ml (1 tablespoon) vegetable oil
Directions
- Prepare the Rind
Pat the pork belly dry with paper towels.
Place it on a cutting board with the skin facing up.
Using a sharp metal skewer or piercing tool, prick small holes all over the rind without piercing into the meat. - Season the Pork
Turn the pork belly over so the meat side faces up.
Leave the pork whole or cut it in half lengthwise if preferred.
Mix the fine salt, sugar, garlic powder, and Chinese five spice powder in a small bowl.
Rub the seasoning evenly over all sides of the meat, avoiding the skin. - Prepare the Salt Bake
Turn the pork skin-side up.
If cut into two pieces, place them back together.
Set the pork on a large sheet of foil and fold the edges upward to create a shallow tray.
Brush the skin evenly with the white vinegar.
Cover the entire rind with an even layer of fine salt.
Let it rest for 5 minutes. - . First Air Fry
Place a paper liner underneath the air fryer basket if using.
Carefully transfer the pork to the basket.
Air fry at 120°C (248°F) for 30 minutes.
If the salt has not hardened completely, continue cooking in 5-minute intervals until a firm crust forms. - Remove the Salt
Lift off the hardened salt crust.
Wipe away any remaining salt from the skin and sides of the pork using kitchen paper.
Discard both the foil and salt. - Final Roast
Return the pork belly to the air fryer basket.
Brush the skin lightly with vegetable oil.
Air fry at 200°C (392°F) for 30–40 minutes, or until the crackling is golden and crisp - Rest and Slice
Transfer the pork belly to a cutting board.
Rest for 15 minutes before slicing.
Turn the pork meat-side up and cut with a sharp knife, pressing firmly through the crackling for clean slices. - Serve
Serve immediately with rice, noodles, fresh vegetables, or your favorite side dishes.
Notes
- Choose a boneless, skin-on pork belly with an even thickness for the best results.
- Keep the skin as dry as possible before cooking.
- Pierce only the skin, not the meat.
- The salt layer helps remove moisture from the rind and is not intended to season the meat.
- Check the crackling after about 20 minutes during the second cook, as air fryers vary.
- If one area browns too quickly, loosely cover it with a small piece of foil while the remaining skin continues to crisp.
- Resting the pork before slicing helps keep the meat juicy.
- For extra flavor and even crispier crackling, season the meat and pierce the skin the night before, then refrigerate uncovered overnight.
Nutrition Facts
- Serving Size: 1 g
- Total number of serves: 5
- Calories: 592kcal
- Fat: 60g
- Saturated Fat: 22g
- Polyunsaturated Fat: 6g
- Monounsaturated Fat: 28g
- Cholesterol: 82mg
- Sodium: 1632mg
- Potassium: 216mg
- Carbohydrates: 11g
- Fiber: 0.1g
- Sugar: 1g
- Protein: 11g
- Vitamin A: 12mcg
- Vitamin C: 0.5mg
- Calcium: 14mg
- Iron: 1mg