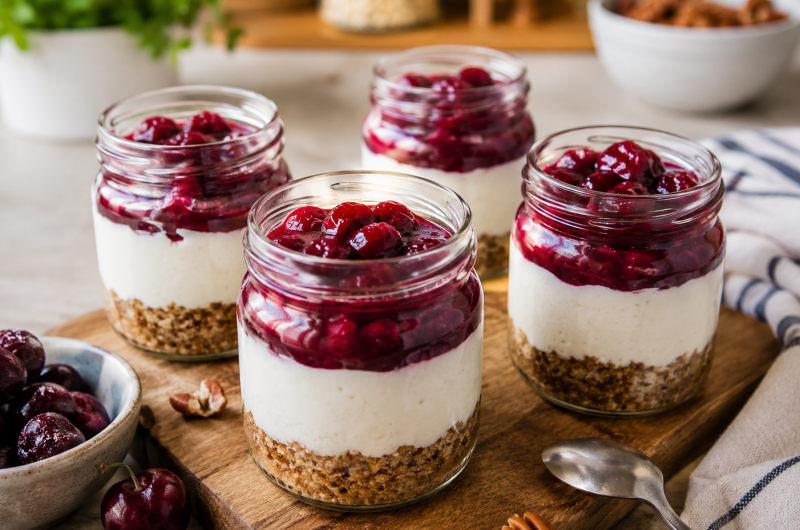
If you are looking for the best gluten free no-bake cheesecake in a jar, this simple dessert is the perfect combination of creamy cheesecake filling, crunchy nut crust, and sweet homemade cherry topping. It requires only a few wholesome ingredients and comes together in just 15 minutes, making it ideal for busy weekdays, family gatherings, parties, or elegant individual desserts. Since it requires no baking, this recipe is beginner-friendly while still delivering the rich flavor and smooth texture of a classic cheesecake. It can also be adapted to be refined sugar free or vegan, making it suitable for a variety of dietary preferences.
Why No-Bake Cheesecake Jars Are So Popular
No-bake desserts have become increasingly popular because they are quick to prepare, require minimal equipment, and deliver impressive results. Cheesecake jars are especially appealing because they are served in individual portions, making them easy to prepare ahead of time and convenient for entertaining. Unlike traditional cheesecakes that require baking, cooling, and lengthy chilling, these jars can be assembled within minutes while still offering the creamy richness people love. Their attractive layered presentation also makes them an excellent dessert for birthdays, holidays, picnics, and dinner parties.
A Healthy Twist on Traditional Cheesecake
Traditional cheesecake often contains large amounts of refined sugar and buttery biscuit crusts. This healthier version replaces those ingredients with naturally wholesome alternatives while maintaining excellent flavor and texture. The crust combines pecans, almond flour, coconut oil, coconut sugar, and a touch of salt for a delicious nutty base. The filling uses Greek yogurt alongside cream cheese to create a lighter consistency with added protein. Fresh cherry topping completes the dessert with naturally fruity sweetness, making every spoonful refreshing without feeling overly heavy.
Fresh Cherries Create a Beautiful Homemade Topping
The cherry topping is one of the highlights of this dessert. Frozen pitted cherries simmer gently with coconut sugar, lemon juice, arrowroot powder, and water until they develop into a glossy fruit sauce. The cherries soften while maintaining their natural flavor, creating a topping that is both vibrant and delicious. Arrowroot powder thickens the mixture naturally, allowing it to spoon beautifully over the cheesecake filling without becoming runny. The result is a colorful topping that balances the richness of the cream cheese with fresh fruit flavor.
Why the Nut Crust Works So Well
Instead of using traditional cookie crumbs, this recipe features a naturally gluten-free crust made from pecans and almond flour. Pecans contribute rich buttery flavor and a satisfying crunch, while almond flour provides a fine texture that helps bind the crust together. Coconut oil acts as the natural binder, allowing the mixture to hold its shape after pressing into the jars. Coconut sugar adds gentle sweetness without overpowering the nutty flavor, and a small amount of kosher salt enhances every ingredient. Together, these simple components create a wholesome crust that complements the creamy filling perfectly.
Understanding the Cheesecake Filling
The filling combines cream cheese, Greek yogurt, maple syrup, and lemon juice to create a smooth and creamy cheesecake mixture. Cream cheese delivers the classic rich flavor associated with traditional cheesecake, while Greek yogurt lightens the texture and adds a pleasant tang. Maple syrup provides natural sweetness with subtle caramel notes, and fresh lemon juice brightens the overall flavor while balancing the richness of the dairy ingredients. This combination produces a silky filling that feels indulgent without becoming overly dense.
Why Greek Yogurt Improves the Recipe
Greek yogurt serves several important purposes in this dessert. It adds protein, contributes a lighter texture, and introduces a refreshing tang that balances the sweetness. Full-fat Greek yogurt creates the creamiest consistency, while lower-fat versions can also be used if preferred. Its smooth texture blends effortlessly with softened cream cheese, creating a filling that is rich enough to satisfy while remaining pleasantly light compared to traditional baked cheesecake.
The Importance of Softened Cream Cheese
Softened cream cheese is essential for creating a lump-free cheesecake filling. Allowing it to reach room temperature before mixing helps it blend smoothly with the yogurt and maple syrup. Cold cream cheese can produce small lumps that are difficult to remove, affecting both appearance and texture. Properly softened cream cheese creates the silky consistency expected from high-quality homemade cheesecake and makes the filling easier to prepare with either a stand mixer or hand mixer.
Making the Cherry Topping
Preparing the cherry topping is straightforward and requires only a few minutes. The cherries, coconut sugar, lemon juice, arrowroot powder, and water are gently simmered over low heat while stirring occasionally. As the fruit softens, the arrowroot naturally thickens the juices into a glossy sauce. Once cooled slightly, the topping becomes the perfect finishing layer for the cheesecake jars. The sweet-tart flavor of the cherries provides a refreshing contrast to the rich filling and crunchy crust.
Preparing the Gluten Free Crust
While the cherries cook, the crust ingredients are blended together in a food processor until they resemble coarse crumbs that hold together when pressed between your fingers. If the mixture feels dry, a small amount of additional coconut oil helps bind everything together. Pressing the crust firmly into the bottom of each serving jar creates a stable foundation that supports the creamy filling above it. The nutty flavor and slightly crisp texture create a pleasant contrast to the smooth cheesecake layer.
Mixing the Cheesecake Filling
The filling is prepared by beating together softened cream cheese, Greek yogurt, maple syrup, and lemon juice until smooth and creamy. Mixing only until combined prevents unnecessary air from entering the filling, helping maintain its rich consistency. The finished mixture should appear silky and spread easily without being runny. This simple preparation requires only a few minutes and creates the luxurious texture that defines this easy no-bake dessert.
Assembling the Cheesecake Jars
Layering is one of the most enjoyable parts of this recipe. Begin by evenly distributing the prepared crust among the serving jars, gently pressing it into place. Spoon the cheesecake filling carefully over the crust, smoothing the surface before adding the cooled cherry topping. The colorful layers create an attractive presentation that looks elegant without requiring advanced decorating skills. Individual jars also make serving easier while eliminating the need for slicing.
Perfect Occasions to Serve Cheesecake Jars
These gluten free cheesecake jars are suitable for almost any occasion. Their individual portions make them ideal for dinner parties, birthday celebrations, bridal showers, holiday desserts, and family gatherings. Because they can be prepared ahead of time, they reduce last-minute kitchen work when entertaining guests. Their refreshing flavor also makes them especially enjoyable during warmer months, although they are delicious throughout the year.
Creative Serving Ideas
Although delicious exactly as prepared, these cheesecake jars can also be presented in creative ways. Fresh cherries, chopped pecans, grated lemon zest, or a small mint leaf add an attractive finishing touch. They pair beautifully with coffee, tea, or fresh fruit platters and can even be served as part of a dessert buffet. The convenient jars also make them excellent portable desserts for picnics or packed lunches.
Notes
Achieving the Smoothest Filling
Always allow the cream cheese to soften before mixing to avoid lumps. Beat the ingredients only until smooth, as overmixing is unnecessary for a no-bake filling. Full-fat Greek yogurt creates the richest consistency, while fresh lemon juice enhances the natural flavor.
Making the Perfect Crust
Blend the crust ingredients until they hold together when pressed between your fingers. If necessary, add a little extra coconut oil to improve binding. Press the crust firmly into the jars to create a stable base for the filling.
Storage Recommendations
Store the assembled cheesecake jars covered in the refrigerator for up to three days. The crust will gradually soften as it absorbs moisture, but the dessert will remain delicious. Freezing is possible, although the texture of the yogurt may change slightly after thawing.
Why This Gluten Free No-Bake Cheesecake in a Jar Will Become Your Favorite Dessert
This Gluten Free No-Bake Cheesecake in a Jar combines creamy cheesecake filling, a wholesome nut crust, and vibrant homemade cherry topping into one elegant dessert that is quick to prepare and easy to enjoy. The balance of rich dairy ingredients, naturally sweet fruit, and crunchy pecans creates a satisfying texture with every bite. Its gluten-free ingredients, adaptable recipe, and beautiful presentation make it suitable for everyday treats as well as special occasions. Whether served immediately or prepared ahead of time, these cheesecake jars deliver impressive flavor, refreshing freshness, and effortless elegance in every serving.
Gluten Free No-Bake Cheesecake in a Jar
A creamy, refreshing, and easy no-bake cheesecake layered with a wholesome pecan crust and homemade cherry topping. These
5
servings5
minutes10
minutes340
kcal15
minutesIngredients
- Cherry Topping
1 cup frozen pitted cherries
2 teaspoons coconut sugar
½ teaspoon lemon juice
1 teaspoon arrowroot powder
3 tablespoons water
- Gluten Free Crust
½ cup raw pecans
¼ cup almond flour
2 tablespoons softened coconut oil
2 tablespoons coconut sugar
¼ teaspoon kosher salt
- Cheesecake Filling
⅔ cup Greek yogurt
6 oz cream cheese
2 tablespoons maple syrup
1 teaspoon lemon juice
Directions
- In a small saucepan, combine the frozen cherries, coconut sugar, lemon juice, arrowroot powder, and water.
- Simmer over low heat for about 10 minutes, stirring occasionally until the mixture thickens. Allow it to cool slightly.
- While the topping cooks, place the pecans, almond flour, coconut oil, coconut sugar, and kosher salt into a food processor.
- Blend until the mixture resembles coarse crumbs that hold together when pressed.
- Divide the crust mixture evenly among four serving jars and press it gently into the bottom.
- In a stand mixer or medium bowl, combine the cream cheese, Greek yogurt, maple syrup, and lemon juice.
- Beat until smooth and creamy, stopping once everything is fully combined.
- Spoon the cheesecake filling evenly over the prepared crust.
- Finish each jar with the cooled cherry topping.
- Serve immediately or refrigerate until ready to enjoy.