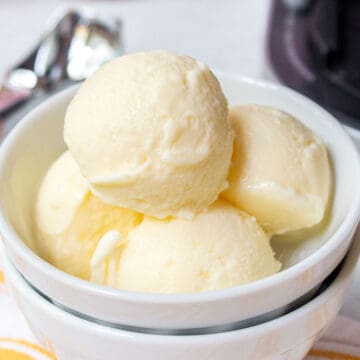
Creating Creamy Protein Ice Cream with Ninja Creami
Are you craving a delicious ice cream treat that doesn’t break your healthy eating goals? This Ninja Creami Vanilla Protein Ice Cream is an absolute game-changer for anyone looking for a dessert that’s high in protein, low in carbs, and incredibly satisfying. With just a few key ingredients, you can whip up this creamy, protein-packed ice cream that will rival any store-bought frozen treat.
The best part? This recipe makes use of the Ninja Creami machine, which is a revolutionary appliance that turns frozen mixtures into smooth, creamy ice cream with minimal effort. If you’re already familiar with the Ninja Creami, you know how easy it is to create frozen delights using ingredients you might already have in your kitchen. If you’re new to this appliance, you’ll quickly fall in love with its ease of use and the luscious results it produces.
Let’s dive deeper into why this recipe is the perfect blend of health and indulgence, how to prepare the ingredients, and everything you need to know about making Ninja Creami Vanilla Protein Ice Cream.
The Power of Protein Ice Cream
One of the standout features of this Ninja Creami Vanilla Protein Ice Cream is its ability to pack in protein while keeping the sugar and carbs to a minimum. Whether you’re following a keto diet, a low-carb regimen, or just looking for a healthier option, this recipe can help you meet your nutrition goals without sacrificing flavor.
- Protein-Rich: The main ingredient in this recipe is Fairlife Core Power Vanilla Protein Shake. This shake is not just any protein drink—it’s a creamy, vanilla-flavored shake that’s rich in high-quality protein. It’s perfect for refueling your muscles after a workout or as a filling treat to keep you satisfied for longer.
- Low Sugar, Low Carb: Stevia is used as the sweetener in this recipe, which means you get the sweetness you crave without any added sugar. The sugar-free instant vanilla pudding mix also keeps the carb content low while enhancing the creamy texture of the ice cream.
- Great for Special Diets: If you’re on a ketogenic diet or following other low-carb eating plans, this recipe is an ideal choice. It’s made with ingredients that fit seamlessly into a keto-friendly lifestyle, and the absence of refined sugars makes it suitable for those watching their blood sugar levels as well.
What Makes Ninja Creami So Special?
If you’re wondering what makes the Ninja Creami stand out among other ice cream makers, it’s all about its versatility and performance. Traditional ice cream makers require bowls of ice and salt, and even then, they don’t always deliver the smooth texture you desire. With the Ninja Creami, all you need to do is prepare your ingredients, freeze them in the pint container, and let the machine do the rest.
Here’s why the Ninja Creami is perfect for making protein ice cream:
- Consistent Creamy Results: The “Creamerizer Paddle” technology breaks down frozen ingredients into a silky-smooth consistency, even when working with protein shakes, which can sometimes be difficult to freeze and blend into a creamy texture. This means you get an ice cream that feels just as smooth and indulgent as traditional full-fat varieties, without all the sugar and fat.
- Easy to Use: Once you prepare your ice cream base and freeze it, the Ninja Creami does all the hard work. It’s as easy as placing the pint into the machine, selecting the Ice Cream setting, and letting the magic happen.
- Customization: If you want to add flavor or texture, the Ninja Creami allows you to add mix-ins during the process. Whether it’s low-carb chocolate chips, fresh berries, or chopped nuts, the machine can evenly incorporate them into the ice cream.
Ingredients You’ll Need for Ninja Creami Vanilla Protein Ice Cream
The ingredients for this simple yet effective protein ice cream recipe are easy to find and likely already sitting in your pantry or fridge. Here’s a breakdown of what you’ll need:
Base Ingredients:
- Fairlife Core Power Vanilla Protein Shake (14 oz for a standard pint or 21 oz for a deluxe pint): The foundation of this ice cream, this protein shake gives the ice cream a creamy texture and a significant protein boost.
- Stevia (1 tablespoon for a standard pint, 2 tablespoons for a deluxe pint): A natural sweetener that adds sweetness without any added sugar or carbs.
- Sugar-Free Instant Vanilla Pudding Mix (1 tablespoon for a standard pint, 2 tablespoons for a deluxe pint): Adds thickness and creaminess to the ice cream while keeping the sugar content low.
Optional Mix-ins:
- You can get creative with mix-ins like crushed almonds, sugar-free chocolate chips, or fresh berries. The Ninja Creami can evenly mix in your favorite toppings during the blending process, adding extra flavor and texture.
How to Make Ninja Creami Vanilla Protein Ice Cream: Step-by-Step Instructions
Now, let’s dive into the steps for making this delicious and nutritious protein ice cream. The process is simple, quick, and easy, especially with the help of the Ninja Creami.
Part 1: Preparing the Ice Cream Base
- Gather Your Ingredients: Depending on the size of the ice cream you want to make, gather either 14 ounces of Fairlife Core Power Vanilla Protein Shake for a standard pint, or 21 ounces for a deluxe pint. You’ll also need stevia, sugar-free instant vanilla pudding mix, and any optional mix-ins.
- Mix the Ingredients: In a large mixing bowl, combine the protein shake, stevia, and pudding mix. Use a whisk to thoroughly blend the ingredients together. Be sure to dissolve the stevia completely, though the pudding mix may not dissolve entirely. This is normal and will contribute to the texture of the ice cream.
- Let the Mixture Settle: After mixing, let the mixture sit for a minute to allow any bubbles to settle. This will help ensure a smooth base when it freezes.
- Pour the Mixture into the Pint: Once the ingredients are well-combined, pour the mixture into the Ninja Creami pint container. Seal the pint with its lid, and place it in the freezer. Let it freeze for at least 12 hours to ensure it is solid enough to process.
Part 2: Using the Ninja Creami to Make Ice Cream
- Prepare the Ninja Creami: After the ice cream base has been frozen for 12 hours, remove the pint from the freezer. Take off the lid and place the pint into the outer bowl of the Ninja Creami.
- Install the Creamerizer Paddle: Attach the Cremerizer Paddle to the lid of the Ninja Creami. This is the key tool for transforming your frozen base into creamy ice cream.
- Processing the Ice Cream: Lock the lid assembly into place, then insert the bowl into the motor base of the Ninja Creami. Twist the bowl until it locks into place and press the Ice Cream button. The machine will begin processing the frozen base, turning it into creamy ice cream. The first spin may appear icy or crumbly, but this is normal for lighter ice cream recipes.
- Re-spin if Necessary: If the texture is still not as smooth as you’d like, simply re-spin the ice cream until it reaches a creamy consistency. Don’t worry if it takes an extra cycle—it’s all part of the process!
- Serve and Enjoy: Once the ice cream is perfectly creamy, scoop it into bowls or cones and enjoy immediately! If you’re adding mix-ins, create a small tunnel in the center of the ice cream and add your chosen toppings. Reassemble the pint and process the mixture again using the Mix-In program to evenly distribute the mix-ins.
Ninja Creami Vanilla Protein Ice Cream Recipe
Prep Time: 5 minutes
Freeze Time: 12 hours
Total Time: 12 hours 5 minutes
Yield: 4 servings
Ingredients
- 14 ounces Fairlife Core Power Vanilla Protein Shake (for standard pint)
- 1 tablespoon stevia
- 1 tablespoon sugar-free instant vanilla pudding mix
Instructions
- In a mixing bowl, combine protein shake, stevia, and pudding mix. Whisk until well mixed, and let the bubbles settle.
- Pour the mixture into a Ninja Creami pint, cover with a lid, and freeze for at least 12 hours.
- Once frozen, insert the pint into the Ninja Creami and process using the Ice Cream setting.
- If needed, re-spin the mixture to achieve a creamy consistency.
- Serve immediately, or add mix-ins during processing if desired.
Optional Mix-ins: You can add keto-friendly toppings like fresh berries, chopped nuts, or sugar-free chocolate chips. To do so, create a small tunnel in the ice cream, add the mix-ins, and process using the Mix-In program.
Enjoy your homemade, protein-packed treat!