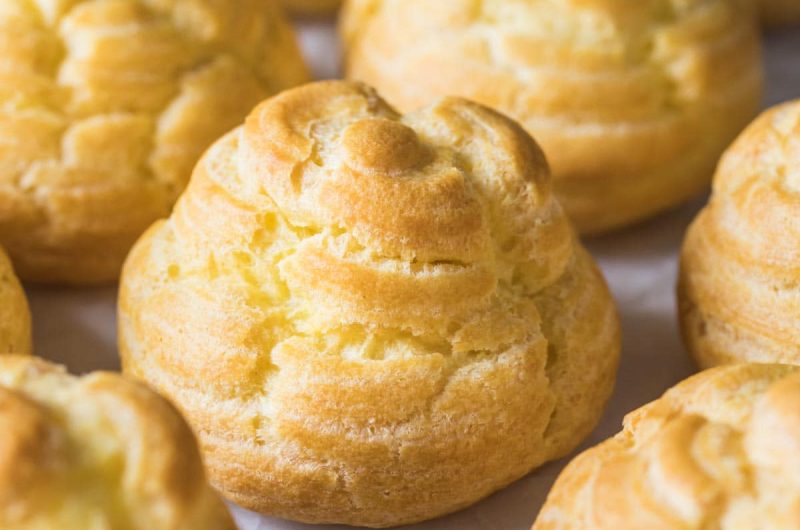
Choux buns are one of the most elegant and versatile pastries in the baking world. Made from a unique dough known as pâte à choux, these light and airy buns are crisp on the outside and hollow on the inside, making them perfect for filling with whipped cream, pastry cream, custard, chocolate mousse, coffee cream, fruit fillings, or even savory mixtures. Despite their impressive appearance, choux buns rely on a relatively simple list of ingredients. The magic lies in the technique.
Unlike cakes, cookies, or yeast breads, choux pastry rises primarily from steam. The high moisture content in the dough transforms into steam during baking, causing the pastry to puff dramatically and create its signature hollow center. Mastering choux pastry opens the door to creating cream puffs, profiteroles, éclairs, croquembouche, Paris-Brest, and many other classic French pastries.
This detailed recipe covers every aspect of making perfect choux buns, from understanding the science behind the dough to preparing a silky filling and troubleshooting common problems.
Preparation Time: 45 minutes
Cooking Time: 40 minutes
Cooling Time: 1 to 2 hours
Total Time: Approximately 3 hours
Yield: 20 to 24 choux buns
Ingredients for the Choux Pastry
250 ml water
125 g unsalted butter
1 tablespoon granulated sugar
½ teaspoon fine salt
150 g all-purpose flour
4 to 5 large eggs, room temperature
Ingredients for the Vanilla Pastry Cream Filling
600 ml whole milk
1 vanilla bean or 2 teaspoons vanilla extract
6 large egg yolks
140 g granulated sugar
50 g cornstarch
40 g unsalted butter
300 ml heavy whipping cream
2 tablespoons powdered sugar
Ingredients for Decoration
Powdered sugar for dusting
Or
150 g dark chocolate, melted
Or
Caramel sauce
Understanding Choux Pastry
Before beginning, it is helpful to understand why choux pastry behaves differently from other doughs.
Most baked goods rely on chemical leavening agents such as baking powder or baking soda. Choux pastry contains neither. Instead, the large amount of water in the dough converts into steam when exposed to the oven’s heat. Because the dough has already developed structure during cooking on the stovetop, it is strong enough to trap the steam. As the steam expands, the pastry inflates and forms a hollow center.
The eggs contribute structure, richness, color, and moisture. The flour provides strength. Butter contributes flavor and tenderness.
Success depends on maintaining the proper balance among all these ingredients.
Preparing the Choux Dough
Begin by selecting a heavy-bottomed saucepan. A sturdy pan helps distribute heat evenly and prevents scorching.
Add the water, butter, sugar, and salt to the saucepan.
Place over medium heat.
Allow the butter to melt completely.
Stir occasionally to ensure everything combines smoothly.
Continue heating until the mixture reaches a full rolling boil.
The liquid should be actively bubbling across the entire surface.
Do not add the flour before the mixture reaches this stage.
Once boiling, remove the pan briefly from the heat.
Add all the flour at once.
Immediately stir vigorously with a wooden spoon or heatproof spatula.
The mixture will initially look rough and uneven.
Continue stirring firmly.
Within a minute, the flour will absorb the liquid and form a thick paste.
Return the pan to medium heat.
Continue cooking and stirring for approximately 2 to 4 minutes.
The dough should form a smooth ball.
It should pull away from the sides of the pan.
You may notice a thin film developing on the bottom of the saucepan.
This is a sign that excess moisture has evaporated and the dough is ready.
Cooking the dough properly at this stage is one of the most important steps in the entire recipe.
If the dough contains too much moisture, the choux buns may collapse later.
Cooling the Dough
Transfer the dough to a large mixing bowl.
Spread it slightly along the sides of the bowl.
Allow it to cool for approximately 5 to 10 minutes.
The dough should remain warm but not hot.
If the dough is excessively hot, the eggs may cook upon contact.
If using a stand mixer, mix the dough on low speed for a few minutes to release steam and accelerate cooling.
Incorporating the Eggs
Crack the eggs into a separate bowl.
Lightly whisk them together.
Add a small amount of egg to the dough.
Mix thoroughly.
At first, the dough may appear separated and slippery.
Keep mixing.
Eventually it will become smooth again.
Continue adding the egg gradually.
After each addition, mix until fully incorporated.
As more egg is added, the dough will become glossy and softer.
The final consistency is extremely important.
Lift a spoonful of dough.
The dough should fall slowly and form a smooth V-shape hanging from the spoon.
If it breaks off immediately, more egg may be needed.
If it pours like batter, too much egg has been added.
The dough should be thick enough to hold its shape but soft enough to pipe smoothly.
Preparing the Baking Trays
Line two large baking sheets with parchment paper.
For uniform buns, draw circles on the back of the parchment using a cookie cutter or small bowl as a guide.
Space the circles well apart because the buns will expand significantly during baking.
Transfer the dough to a piping bag fitted with a large round tip.
Piping the Choux Buns
Hold the piping bag vertically above the baking tray.
Apply steady pressure.
Pipe rounds approximately 5 centimeters in diameter.
Stop pressure before lifting the piping bag away.
A small peak may form on top.
Dip your finger in water.
Gently smooth the peaks.
This helps create evenly rounded buns.
Continue until all the dough has been used.
Leave several centimeters between each bun.
Applying an Egg Wash
For a glossy finish, whisk one egg with a tablespoon of milk.
Lightly brush the tops of the buns.
Avoid letting excess egg wash drip onto the parchment.
Too much egg wash can interfere with rising.
Baking the Choux Buns
Preheat the oven to 200°C.
Place the trays in the center of the oven.
Bake for 15 minutes.
Do not open the oven door.
Opening the oven too early can cause the pastries to collapse.
After 15 minutes, reduce the oven temperature to 180°C.
Continue baking for an additional 20 to 25 minutes.
The buns should become deeply golden brown.
They should feel light when lifted.
The shells should appear dry and firm.
The color is important.
Pale choux buns usually contain too much moisture and may collapse during cooling.
Drying the Shells
When the buns are fully baked, remove the trays briefly.
Using a skewer or small knife, poke a tiny hole in each bun.
Return them to the turned-off oven.
Leave the oven door slightly open.
Allow the buns to sit for 10 to 15 minutes.
This extra step allows trapped steam to escape.
It creates crisp shells with better stability.
Cooling Completely
Transfer the baked buns to a wire rack.
Allow them to cool completely.
Never fill warm choux buns.
The heat can melt the filling and create excess moisture inside the shell.
Making the Vanilla Pastry Cream
Pour the milk into a saucepan.
If using a vanilla bean, split it lengthwise and scrape out the seeds.
Add both seeds and pod to the milk.
Heat gently until steaming.
Do not boil.
Meanwhile, whisk together the egg yolks, sugar, and cornstarch in a large bowl.
Whisk until smooth and pale.
Slowly pour the hot milk into the egg mixture while whisking continuously.
This process is known as tempering.
It gradually raises the temperature of the eggs and prevents curdling.
Return the entire mixture to the saucepan.
Cook over medium heat.
Whisk constantly.
The mixture will gradually thicken.
Once thick and smooth, continue cooking for another minute.
Remove from the heat.
Add the butter.
Stir until fully incorporated.
Transfer to a clean bowl.
Cover the surface directly with plastic wrap.
Allow to cool completely.
Refrigerate until thoroughly chilled.
Preparing the Whipped Cream
Pour the heavy cream into a chilled bowl.
Add the powdered sugar.
Whip until medium peaks form.
Do not overwhip.
The cream should remain smooth and silky.
Fold the whipped cream into the chilled pastry cream.
Use gentle movements to preserve the light texture.
The resulting filling is rich, creamy, and luxurious.
Filling the Choux Buns
Transfer the filling to a piping bag fitted with a small round tip.
Insert the tip into the hole made earlier.
Pipe cream into each bun.
Continue until the bun feels heavy and full.
Alternatively, slice each bun in half horizontally.
Fill generously with cream and replace the top.
Decorating the Choux Buns
Dust lightly with powdered sugar for a classic presentation.
For a chocolate version, drizzle melted dark chocolate over the tops.
For a caramel version, spoon warm caramel sauce across the buns.
For special occasions, combine chocolate drizzle and toasted nuts.
Flavor Variations
Chocolate Cream Choux Buns
Add 200 g chopped dark chocolate to the hot pastry cream.
Stir until melted.
Cool completely before filling.
Coffee Cream Choux Buns
Dissolve 2 teaspoons instant espresso powder in 1 tablespoon hot water.
Mix into the pastry cream.
The coffee flavor pairs beautifully with the buttery pastry shell.
Strawberry Cream Choux Buns
Fold finely diced strawberries into lightly sweetened whipped cream.
Fill the buns shortly before serving.
Lemon Cream Choux Buns
Add fresh lemon zest and lemon juice to the pastry cream.
This variation offers a bright and refreshing flavor.
Salted Caramel Choux Buns
Fill the buns with pastry cream and add a spoonful of salted caramel in the center.
This creates a delightful surprise inside each pastry.
Tips for Professional Results
Always measure ingredients accurately.
Use room-temperature eggs.
Cook the flour mixture thoroughly.
Add eggs gradually.
Do not rush the mixing process.
Pipe evenly sized buns.
Avoid opening the oven during the first part of baking.
Bake until deeply golden.
Allow steam to escape after baking.
Cool completely before filling.
Store properly to preserve texture.
Common Problems and Solutions
If the buns collapse after cooling, they were likely underbaked or contained too much moisture.
If the dough is runny, too many eggs were added.
If the buns do not rise properly, the oven may not have been hot enough.
If the shells are soft, they may need additional baking time.
If the filling leaks, the buns may have been overfilled.
Storage Instructions
Unfilled shells can be stored in an airtight container for up to two days.
They can also be frozen for up to two months.
To refresh frozen shells, place them in a 170°C oven for several minutes until crisp.
Filled choux buns should be refrigerated.
For the best texture and flavor, consume within 24 hours.
Serving Suggestions
Serve choux buns with freshly brewed coffee, tea, or hot chocolate.
Arrange them on a dessert platter for celebrations.
Stack them into a croquembouche tower for weddings and special occasions.
Fill them with seasonal fruits and cream for summer gatherings.
Use miniature versions for elegant afternoon tea parties.
Whether served simply with powdered sugar or elaborately filled with rich creams and toppings, homemade choux buns offer an irresistible combination of crisp pastry and luscious filling. With patience, careful technique, and attention to detail, these beautiful pastries can rival those found in the finest French bakeries, making them a rewarding and impressive addition to any baker’s repertoire.