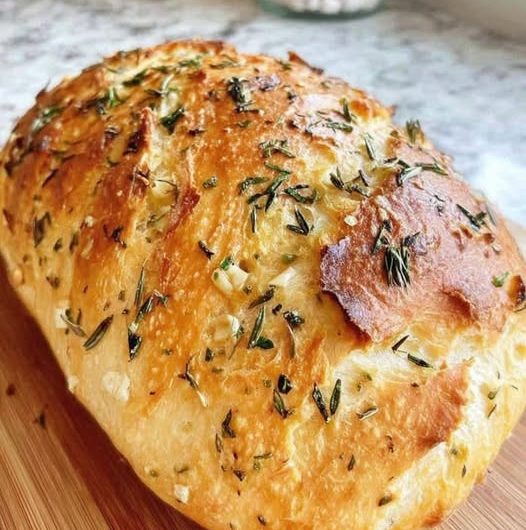
There is something incredibly satisfying about pulling a freshly baked loaf of bread from the oven. The crisp crust, the warm aroma filling the kitchen, and the soft interior make homemade bread hard to resist. This gluten-free no-knead bread is one of those recipes that looks impressive but requires very little hands-on work. Even without traditional wheat flour, the loaf develops a beautifully golden crust and a tender, airy crumb that slices wonderfully once cooled.
Unlike many gluten-free bread recipes that call for a long list of specialty ingredients, this version keeps things refreshingly simple. With just gluten-free bread flour, yeast, salt, and warm water, it’s possible to create a rustic loaf that feels just like bakery-style artisan bread. The long resting time does most of the work, allowing the dough to slowly develop flavor while requiring almost no effort from the baker.
Why I Love Making This Bread
Whenever I want fresh bread without spending hours kneading dough, this recipe is the first one I reach for. After mixing the ingredients together, the bowl simply rests while the yeast works its magic. There is no complicated shaping technique or stand mixer required.
The result is a loaf with a crisp, crackly crust and a light interior that tastes wonderful fresh from the oven. Once cooled, it slices beautifully for sandwiches, toast, or simply enjoying with butter.
Another reason I enjoy making this bread is that it fits into a busy schedule. The dough can rise overnight or throughout the day, so most of the preparation happens while I’m doing other things around the house.
A Simple Ingredient List
One of the biggest surprises about this recipe is how few ingredients it requires. There are no complicated binders or long lists of specialty products. A quality gluten-free bread flour forms the foundation, while yeast gives the loaf its rise and classic bread flavor. Salt balances everything, and warm water brings the dough together.
Because the ingredient list is so short, each one plays an important role. Using a gluten-free bread flour blend designed specifically for bread helps produce the best texture and structure. Warm water encourages the yeast to become active, while salt strengthens the overall flavor of the finished loaf.
The Secret Behind the Texture
- Many gluten-free breads can be dense or slightly gummy, but this method creates a much lighter loaf. The extended rising time allows the dough to slowly develop, producing better flavor and a more open crumb.
- Another important factor is baking the loaf inside a preheated Dutch oven. The enclosed pot traps steam during the first part of baking, helping the bread rise beautifully before the crust sets. Once the lid is removed, the outside becomes deeply golden and wonderfully crisp.
- This simple baking method gives homemade gluten-free bread the appearance and texture of artisan bakery bread without requiring complicated techniques.
Long Rise, Less Work
- The beauty of no-knead bread is that time replaces effort. Instead of spending several minutes kneading, all the ingredients are stirred together until combined. The dough is then covered and left alone for many hours.
- During this slow rise, the yeast gradually develops flavor while creating tiny air pockets throughout the dough. Even though gluten-free dough won’t appear quite as bubbly as traditional wheat dough, it will noticeably increase in volume and become softer.
- After the long rise, only a few gentle folds are needed before shaping the loaf. This keeps the process easy enough for beginners while still producing excellent results.
A Bread That Fits Any Meal
- One reason this recipe has become a favorite in my kitchen is its versatility. Fresh slices are delicious served warm with salted butter for breakfast. Toasted slices pair perfectly with homemade jam, while thicker pieces make excellent sandwich bread after cooling completely.
- The hearty crust also makes this loaf ideal for serving alongside soups and stews. It pairs especially well with creamy vegetable soups, hearty chili, or tomato-based dishes where every slice can soak up the flavorful broth.
- For casual dinners, I often place the whole loaf on a wooden board and let everyone tear off pieces while the bread is still slightly warm. It instantly makes any meal feel more comforting.
Perfect for Beginners
- If you’ve never baked gluten-free bread before, this recipe is a wonderful place to start. The method is forgiving, the ingredient list is short, and there are very few opportunities to make mistakes.
- Since there is no complicated kneading process, you don’t need previous bread-making experience. Simply combine the ingredients, allow the dough plenty of time to rise, shape it gently, and bake it inside a hot Dutch oven.
- Watching the loaf transform inside the oven is one of the most rewarding parts of the process. The dough slowly expands, develops a beautifully browned crust, and fills the kitchen with the unmistakable aroma of freshly baked bread. By the time it finishes baking, it’s hard to believe that such a rustic artisan loaf came together with only four basic ingredients and a little patience.
Shaping the Dough
- After the dough has finished its long rise, it will look soft and slightly sticky. Gluten-free dough doesn’t behave exactly like traditional wheat dough, so don’t expect it to stretch or become full of large bubbles. Instead, it should feel airy enough to handle with a light dusting of flour.
- Turn the dough onto a lightly floured work surface and gently fold it over itself several times. Around six gentle folds are enough to help shape the loaf without overworking it. The goal isn’t to knead the dough but simply to bring it together into a smooth round ball.
- Place the shaped dough seam-side down, dust the top lightly with flour, and cover it with a clean kitchen towel. During the second rise, the loaf becomes slightly puffier and holds its shape better before baking.
Why a Dutch Oven Makes Such a Difference
- One of the best parts of this recipe is baking the bread inside a preheated Dutch oven. This single piece of cookware helps create the crisp crust that makes homemade artisan bread so enjoyable.
- As the dough bakes with the lid on, steam becomes trapped inside the pot. That steam keeps the outside of the loaf soft long enough for the bread to expand fully. Once the loaf has risen, removing the lid allows the crust to brown and become wonderfully crisp.
- The finished loaf develops a rich golden color with a crackly exterior and a tender center that stays soft without becoming gummy.
Baking Until Perfectly Golden
A hot oven is essential for achieving the best texture. Preheating both the oven and the Dutch oven gives the dough an immediate burst of heat, helping it rise quickly during the first stage of baking.
The bread begins baking with the lid in place before finishing uncovered. This two-step process creates the ideal balance between a soft interior and a crisp crust.
Every oven is slightly different, so baking times may vary by a few minutes. Rather than relying only on the clock, look for a deep golden-brown crust. If using an instant-read thermometer, the center should register about 209–210°F (98–99°C) when fully baked.
Let the Bread Cool Completely
- As tempting as it is to slice into fresh bread right away, allowing it to cool is one of the most important steps.
- During cooling, the inside of the loaf continues to set. Cutting it too soon can leave the center slightly gummy because the starches haven’t finished settling. Waiting at least one to two hours gives the loaf enough time to develop the light, even texture that makes each slice easy to cut.
- Once cooled, use a sharp serrated knife to slice through the crisp crust without crushing the soft interior.
Easy Ways to Serve It
- This bread works with almost any meal throughout the day.
- In the morning, lightly toast a slice and spread it with butter, fruit preserves, or honey. The crisp edges and soft center make breakfast feel extra comforting.
- At lunch, thicker slices make excellent sandwiches because the bread is sturdy enough to hold fillings without falling apart.
- For dinner, serve warm slices beside bowls of soup, stew, or chili. The hearty crust is perfect for soaking up flavorful broths while still holding its texture.
- You can also enjoy it with olive oil, herb butter, soft cheeses, or your favorite spreads as a simple appetizer.
Simple Variations
- Although the basic loaf is delicious on its own, a few small additions can create new flavors while keeping the recipe simple.
- Fresh herbs such as rosemary, thyme, or oregano can be mixed into the dough before the first rise for an aromatic loaf that pairs beautifully with soups and pasta dishes.
- For extra texture, sesame or poppy seeds can be stirred into the dough or sprinkled over the top before baking.
- If you prefer a slightly saltier loaf, increase the salt within the suggested range or finish the top with a light sprinkle of flaky salt before baking.
- These small changes add variety while preserving the rustic character of the bread.
Helpful Bread-Making Tips
- A warm environment helps the dough rise more efficiently. If your kitchen is cool, place the covered bowl near the oven or in another warm spot to encourage steady fermentation.
- The long rise is what develops the bread’s flavor, so avoid rushing this step. Leaving the dough for 16 to 18 hours, or even longer, produces a deeper, more complex taste.
- If your schedule changes, the dough can also be refrigerated after the initial rise for up to three days. When you’re ready to bake, let it warm at room temperature before shaping and continuing with the recipe.
- Always preheat the Dutch oven thoroughly before adding the dough. This immediate heat helps create excellent oven spring and contributes to the signature crisp crust.
Storing Leftovers
- Homemade gluten-free bread is best enjoyed fresh, but it stores surprisingly well.
- If you’ll finish the loaf within a day, wrap it in a clean kitchen towel or place it inside a paper bread bag and leave it at room temperature overnight.
- For longer storage, slice the cooled loaf before freezing. Individual slices are easy to remove whenever needed and can go directly into a toaster or warm oven without thawing first.
- The entire loaf may also be frozen in a freezer-safe bag for up to two months. Just be sure it has cooled completely before storing to prevent excess moisture from forming inside the bag.
A Homemade Loaf Worth Making Again
This gluten-free no-knead bread proves that baking fresh artisan-style bread doesn’t have to be complicated. With only four everyday ingredients, a long resting time, and the help of a hot Dutch oven, it’s possible to create a loaf with a beautifully crisp crust and a soft, satisfying interior.
Whether served alongside soup, toasted for breakfast, or enjoyed with a little butter while still slightly warm, this bread is one of those dependable recipes that fits into everyday cooking. Once you see how simple the process is and taste the fresh homemade results, it’s easy to make this loaf a regular part of your baking routine.
Gluten-Free No-Knead Bread
Description
This rustic gluten-free no-knead bread has a crisp golden crust and a soft, tender center with a delicious homemade flavor. Made with only four simple ingredients, it requires very little hands-on work. A long rise and baking in a hot Dutch oven create an artisan-style loaf that’s perfect for toast, sandwiches, or serving alongside soups and stews.
Recipe Details
- Prep Time: 10 minutes
- Rise Time: 18 hours
- Cook Time: 1 hour
- Total Time: 19 hours 10 minutes
- Yield: 10 servings
- Cuisine: American
- Course: Bread
Ingredients
- 4 cups gluten-free bread flour (King Arthur Gluten-Free Bread Flour or a similar gluten-free bread flour blend)
- ½ teaspoon instant yeast
- 1 to 1½ teaspoons fine sea salt
- 2¾ cups warm water, plus a few extra tablespoons if needed
Instructions
- Mix the Dough
- In a large mixing bowl, combine the gluten-free bread flour, instant yeast, and fine sea salt. Pour in the warm water and stir until all of the flour is fully incorporated. If the dough seems dry, add additional warm water one tablespoon at a time until a soft dough forms.
- First Rise
- Cover the bowl with plastic wrap or a clean kitchen towel. Place it in a warm spot and allow the dough to rise for 16 to 18 hours, or longer if desired.
- Preheat the Oven
- When you’re ready to bake, place a Dutch oven with its lid inside the oven. Preheat the oven to 500°F (260°C) while the Dutch oven heats thoroughly.
- Shape the Dough
- Lightly flour a large work surface. Turn the dough out onto the floured surface and dust with a little extra flour if it’s too sticky to handle. Gently fold and knead the dough about six times, then shape it into a smooth round loaf.
- Place the loaf seam-side down on the floured surface, lightly dust the top with flour, cover with a towel, and let it rise for 1 hour.
- Bake
- Carefully transfer the dough into the hot Dutch oven. If desired, score the top of the loaf with a sharp knife before or after placing it in the pot.
- Cover with the lid, reduce the oven temperature to 450°F (232°C), and bake for 40 minutes.
- Remove the lid and continue baking for 20–30 minutes, or until the loaf is deep golden brown and fully baked.
- Cool
- Transfer the bread to a wire rack and allow it to cool for at least 1 hour before slicing. Cooling completely helps the crumb finish setting and improves the texture.
Notes
- For the best flavor, let the dough rise for at least 16–18 hours. A longer rise develops a deeper, more complex taste.
- After the initial rise, the covered dough can be refrigerated for up to 3 days. Bring it back to room temperature before shaping and baking.
- Rising the dough in a warm location encourages better fermentation. If your kitchen is cool, simply allow a little extra rising time.
- Always preheat the Dutch oven before adding the dough. The hot pot creates steam that helps produce a crisp, crackly crust.
- Starting the oven at 500°F and reducing it to 450°F after placing the bread inside helps the loaf rise properly while baking evenly.
- Baking times may vary depending on your oven. If using an instant-read thermometer, the bread is fully baked when the center reaches 209–210°F (98–99°C).
- Resist slicing the loaf while it’s still hot. Allowing it to cool gives the interior time to fully set and prevents a gummy texture.
Nutrition (Per Serving)
- Calories: 168
- Carbohydrates: 39g
- Protein: 3g
- Fat: 0.4g
- Saturated Fat: 0.1g
- Monounsaturated Fat: 0.03g
- Sodium: 352mg
- Potassium: 6mg
- Fiber: 1g
- Sugar: 0.05g
- Vitamin C: 0.002mg
- Calcium: 2mg
- Iron: 0.02mg