Lotus Biscoff Cheesecake Dessert is a rich, creamy, and irresistibly indulgent no-bake dessert that combines the unique caramelized flavor of Lotus Biscoff cookies with a smooth cheesecake filling and luscious layers of Biscoff spread. This dessert has become a favorite worldwide because of its perfect balance of creamy texture, buttery cookie flavor, and luxurious sweetness.
The combination of crushed Biscoff cookies, silky cream cheese filling, whipped cream, and melted Biscoff spread creates a dessert that is elegant enough for celebrations yet simple enough for everyday enjoyment. Every spoonful delivers layers of creamy cheesecake and crunchy cookie goodness, making it an unforgettable treat.
This recipe creates a large family-sized dessert that serves 10 to 12 people generously.
Preparation Time
Preparation Time: 40 minutes
Chilling Time: 6 to 8 hours
Total Time: Approximately 8 hours
Servings: 10 to 12
Difficulty Level: Easy
Ingredients
For the Biscoff Cookie Base
400 grams Lotus Biscoff cookies
180 grams unsalted butter, melted
2 tablespoons brown sugar
1 teaspoon cinnamon
For the Cheesecake Filling
500 grams full-fat cream cheese, softened
250 grams mascarpone cheese
1 cup powdered sugar
2 teaspoons vanilla extract
2 tablespoons Biscoff spread
2 cups heavy whipping cream, cold
For the Biscoff Layer
250 grams Lotus Biscoff spread
3 tablespoons heavy cream
For the Topping
150 grams Lotus Biscoff cookies, crushed
100 grams Lotus Biscoff spread
2 tablespoons heavy cream
Whipped cream for decorating if desired
Extra cookie crumbs for garnish
Equipment Needed
Food processor
Mixing bowls
Electric mixer
Rubber spatula
9-inch springform pan or large serving dish
Offset spatula
Measuring cups
Measuring spoons
Microwave-safe bowl
Refrigerator
Understanding the Dessert
Before beginning, it helps to understand the structure of this cheesecake.
The dessert consists of four distinct layers:
The buttery Biscoff cookie crust.
The rich cheesecake filling.
The smooth Biscoff spread layer.
The decorative topping made with cookie crumbs and drizzled Biscoff spread.
Each layer contributes a unique texture and flavor that makes the finished dessert extraordinary.
Step 1: Preparing the Cookie Crumbs
Place the Lotus Biscoff cookies into a food processor.
Pulse until fine crumbs form.
The texture should resemble coarse sand.
If you do not have a food processor, place the cookies in a sealed plastic bag and crush them using a rolling pin.
Transfer the crumbs to a large mixing bowl.
Add brown sugar and cinnamon.
Mix thoroughly.
The cinnamon enhances the caramelized flavor already present in the cookies.
Step 2: Creating the Crust
Pour the melted butter over the cookie crumbs.
Mix until every crumb is evenly coated.
The mixture should resemble wet sand.
When squeezed in your hand, it should hold together.
Transfer the crumb mixture into a springform pan or serving dish.
Press firmly using the back of a spoon or the bottom of a measuring cup.
Create an even layer across the bottom.
For extra texture, press some crumbs slightly up the sides of the pan.
Place the crust in the refrigerator for at least 30 minutes.
This chilling step helps the crust firm up properly.
Step 3: Preparing the Cream Cheese
Remove the cream cheese from the refrigerator approximately one hour before starting.
Softened cream cheese blends more smoothly and prevents lumps.
Place the cream cheese into a large mixing bowl.
Beat using an electric mixer on medium speed for about 3 minutes.
The cream cheese should become smooth, fluffy, and creamy.
Add the mascarpone cheese.
Continue mixing until fully incorporated.
The mascarpone adds richness and a luxurious texture.
Step 4: Adding Sweetness and Flavor
Add the powdered sugar gradually.
Mix slowly at first to prevent the sugar from flying out of the bowl.
Increase the speed and continue mixing until smooth.
Add vanilla extract.
Add two tablespoons of Biscoff spread.
Continue beating until fully incorporated.
The filling should be silky and free from lumps.
Taste the mixture.
At this stage, you should notice a delicate balance between creamy richness and caramelized cookie flavor.
Step 5: Whipping the Cream
In a separate chilled bowl, pour the cold heavy whipping cream.
Beat using an electric mixer.
Begin at medium speed.
Gradually increase to high speed.
Continue until stiff peaks form.
The whipped cream should hold its shape firmly.
Do not overwhip, as it can become grainy.
Perfectly whipped cream creates a light and airy cheesecake texture.
Step 6: Combining the Filling
Using a rubber spatula, gently fold the whipped cream into the cream cheese mixture.
Work slowly.
Use large folding motions.
Avoid vigorous stirring.
The goal is to maintain as much air as possible.
Continue folding until fully combined.
The finished filling should be light, fluffy, and smooth.
Step 7: Filling the Pan
Remove the chilled crust from the refrigerator.
Spoon half of the cheesecake filling onto the crust.
Spread evenly using an offset spatula.
Smooth the surface carefully.
Place the pan into the refrigerator for 15 minutes.
This brief chilling period helps stabilize the first layer.
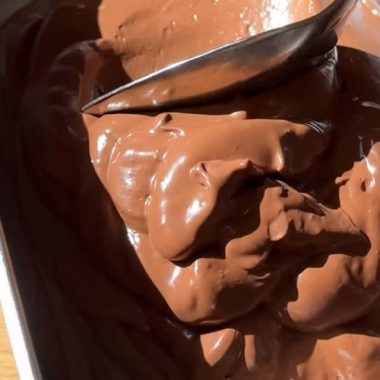
Step 8: Creating the Biscoff Layer
Place the Biscoff spread and heavy cream into a microwave-safe bowl.
Heat for approximately 20 to 30 seconds.
Stir until smooth and pourable.
Allow the mixture to cool slightly.
Pour half of the melted Biscoff mixture over the first cheesecake layer.
Spread gently.
The layer should remain distinct and visible.
Step 9: Adding the Remaining Filling
Carefully spread the remaining cheesecake filling over the Biscoff layer.
Use an offset spatula to create an even surface.
Smooth the top thoroughly.
Refrigerate for another 20 minutes before adding the final topping.
This ensures clean layers.
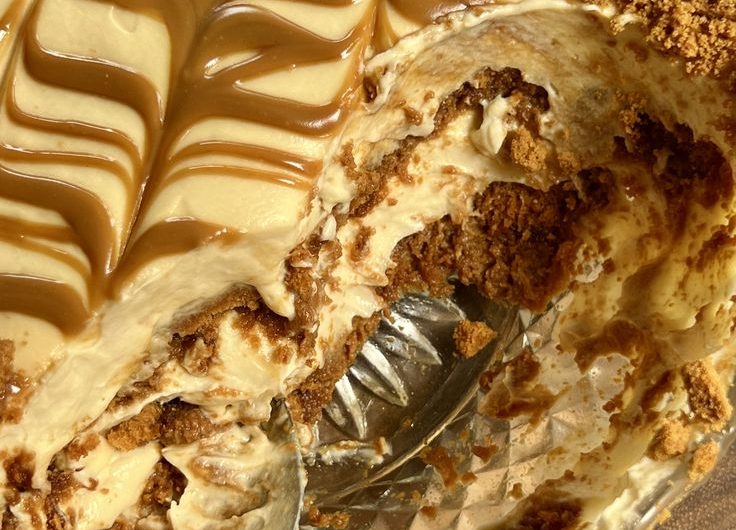
Step 10: Preparing the Decorative Topping
Combine the remaining Biscoff spread with two tablespoons of heavy cream.
Microwave briefly until smooth.
Allow it to cool slightly.
Pour over the top layer.
Spread evenly or create decorative patterns.
Using a spoon or piping bag, drizzle lines across the surface.
Drag a toothpick through the lines to create elegant feathered designs.
This creates the beautiful pattern commonly seen on bakery-style Biscoff cheesecakes.
Step 11: Adding Cookie Crumbs
Crush the remaining Lotus Biscoff cookies.
Sprinkle generously around the edges.
Leave the center visible to showcase the decorative pattern.
The cookie crumbs add both texture and visual appeal.
For an extra luxurious appearance, pile additional crumbs around the perimeter.
Step 12: Chilling the Cheesecake
Cover the cheesecake carefully.
Place in the refrigerator.
Chill for at least 6 hours.
Overnight chilling is strongly recommended.
This allows the cheesecake to set completely.
The flavors also develop and intensify during this time.
Patience during chilling is rewarded with a much better texture.
Step 13: Unmolding and Serving
If using a springform pan, carefully release the sides.
Transfer the cheesecake to a serving platter.
Slice using a sharp knife.
For clean slices, dip the knife into hot water and wipe dry before each cut.
This technique produces beautiful bakery-style portions.
Serving Suggestions
Serve chilled.
Pair with coffee.
Serve alongside tea.
Add whipped cream if desired.
Drizzle extra Biscoff spread over each slice.
Serve with fresh strawberries for contrast.
Accompany with vanilla ice cream.
Enjoy as an elegant dessert after dinner.
Storage Instructions
Store covered in the refrigerator.
The cheesecake remains fresh for up to 5 days.
Keep away from strong-smelling foods.
The flavor often improves after the first day.
For best texture, serve directly from the refrigerator.
Freezing Instructions
Wrap individual slices tightly.
Store in airtight containers.
Freeze for up to 2 months.
Thaw overnight in the refrigerator before serving.
Avoid microwaving to thaw.
Common Mistakes to Avoid
Using cold cream cheese.
Overmixing the whipped cream.
Skipping chilling time.
Adding warm Biscoff spread directly onto the filling.
Using low-fat cream cheese.
Overwhipping the cream.
Rushing the layering process.
Each of these mistakes can affect texture and stability.
Professional Baker’s Tips
Use full-fat ingredients for maximum richness.
Chill mixing bowls before whipping cream.
Press the crust firmly for clean slices.
Allow each layer to set slightly before adding the next.
Use premium-quality cream cheese.
Always chill overnight if possible.
Warm the knife between cuts.
Decorate immediately before serving for the freshest appearance.
Flavor Variations
Extra Biscoff Version
Add additional Biscoff spread to the filling.
Mix crushed cookies directly into the cheesecake layer.
Drizzle extra spread between layers.
Chocolate Biscoff Cheesecake
Add melted milk chocolate to the filling.
Use chocolate shavings as garnish.
Drizzle chocolate sauce over the top.
Salted Caramel Biscoff Cheesecake
Add salted caramel sauce between layers.
Sprinkle flaky sea salt over the topping.
Increase the caramel notes significantly.
White Chocolate Biscoff Cheesecake
Incorporate melted white chocolate into the filling.
Decorate with white chocolate curls.
Pair with extra cookie crumbs.
Nutritional Overview
This dessert is rich in dairy, providing calcium and protein.
The Biscoff cookies contribute their signature caramelized flavor.
Cream cheese and mascarpone create luxurious texture.
While highly indulgent, it is designed as a special-occasion dessert meant to be enjoyed and savored.
Conclusion
Lotus Biscoff Cheesecake Dessert is an exceptionally creamy, rich, and elegant no-bake dessert that showcases the beloved flavor of Lotus Biscoff cookies and spread in every layer. With its buttery cookie crust, velvety cheesecake filling, silky Biscoff layers, and decorative crumb topping, it delivers a perfect combination of texture and flavor. Whether served at birthdays, family gatherings, holiday celebrations, or dinner parties, this dessert consistently impresses guests and satisfies even the most devoted cheesecake lovers. The balance of creamy richness and caramelized cookie flavor makes it a timeless dessert that deserves a place in every baker’s collection.