Cottage Cheese Chocolate Mousse
Cottage Cheese Chocolate Mousse is a rich, creamy, protein-packed dessert that transforms simple ingredients into an indulgent treat with a smooth texture and deep chocolate flavor. Unlike traditional chocolate mousse, which often relies on heavy cream, eggs, and large amounts of sugar, this version uses cottage cheese as its foundation. The result is a lighter yet satisfying dessert that offers a wonderful balance of nutrition and decadence.
When blended properly, cottage cheese becomes remarkably silky and smooth, creating a mousse that is difficult to distinguish from more traditional versions. Combined with cocoa powder, melted chocolate, and natural sweeteners, it develops a luxurious texture and rich flavor that makes it suitable for everyday enjoyment as well as special occasions.
This recipe produces approximately 6 generous servings.
Preparation Time
Preparation Time: 20 minutes
Chilling Time: 2 to 4 hours
Total Time: Approximately 4 hours
Servings: 6
Difficulty Level: Easy
Ingredients
For the Mousse
2 cups full-fat cottage cheese
½ cup unsweetened cocoa powder
200 grams dark chocolate, melted and slightly cooled
⅓ cup honey or maple syrup
2 teaspoons vanilla extract
¼ teaspoon fine sea salt
3 tablespoons milk
Optional Ingredients for Extra Richness
2 tablespoons cream cheese
2 tablespoons Greek yogurt
1 tablespoon instant espresso powder
Optional Toppings
Dark chocolate shavings
Fresh strawberries
Fresh raspberries
Whipped cream
Cocoa powder
Crushed almonds
Crushed hazelnuts
Chocolate curls
Mini chocolate chips
Equipment Needed
High-speed blender
Food processor
Mixing bowls
Rubber spatula
Measuring cups
Measuring spoons
Serving glasses or ramekins
Microwave-safe bowl
Refrigerator
Understanding This Recipe
The secret to exceptional Cottage Cheese Chocolate Mousse lies in blending the cottage cheese thoroughly.
Many people associate cottage cheese with a curdled texture, but when processed correctly, it becomes silky, creamy, and smooth. This unique characteristic makes it an excellent base for healthier desserts.
The cocoa powder provides deep chocolate flavor.
The melted chocolate contributes richness.
The honey or maple syrup balances bitterness.
Vanilla enhances sweetness and complexity.
Together, these ingredients create a mousse that is both nutritious and indulgent.
Step 1: Preparing the Chocolate
Begin by chopping the dark chocolate into small pieces.
Place the chocolate in a microwave-safe bowl.
Heat in 20-second intervals.
Stir between each interval.
Continue until completely melted.
Alternatively, melt the chocolate using a double boiler.
Once melted, allow the chocolate to cool slightly.
The chocolate should remain fluid but not hot.
If the chocolate is too hot, it may affect the texture of the mousse.
Step 2: Preparing the Cottage Cheese
Place the cottage cheese into a blender or food processor.
Blend continuously for approximately 2 to 3 minutes.
Pause occasionally to scrape down the sides.
Continue blending until the mixture becomes completely smooth.
No visible curds should remain.
This step is extremely important.
A perfectly blended cottage cheese base creates the luxurious texture that makes this dessert special.
The mixture should resemble thick cream cheese or silky yogurt.
Step 3: Adding the Cocoa Powder
Add the cocoa powder to the blended cottage cheese.
Blend again until fully incorporated.
The mixture will darken significantly.
Ensure there are no dry pockets of cocoa powder.
Scrape down the sides of the blender if necessary.
The cocoa powder should distribute evenly throughout the mixture.
Step 4: Incorporating the Sweetener
Add honey or maple syrup.
Pour slowly into the blender.
Add vanilla extract and sea salt.
Blend until smooth.
The sweetener not only provides sweetness but also contributes to the silky consistency of the mousse.
Taste the mixture.
Adjust sweetness according to personal preference.
If you prefer a darker chocolate flavor, maintain the original amount.
For a sweeter dessert, add an additional tablespoon of honey.
Step 5: Adding the Melted Chocolate
With the blender running on low speed, slowly pour in the melted chocolate.
Continue blending until completely incorporated.
The mousse will become richer and more luxurious.
The color will deepen into a beautiful chocolate brown.
Blend for another minute to ensure complete smoothness.
At this stage, the mousse should appear glossy and thick.
Step 6: Enhancing the Texture
Add the milk.
Blend briefly.
The milk helps create a softer and more mousse-like consistency.
If using cream cheese or Greek yogurt, add them now.
Blend until completely smooth.
These additions create an even richer texture and add complexity to the flavor.
Step 7: Optional Espresso Enhancement
For a deeper chocolate flavor, add instant espresso powder.
The espresso does not make the dessert taste like coffee.
Instead, it intensifies the chocolate notes and creates a more sophisticated flavor profile.
Blend thoroughly.
Many professional pastry chefs use this technique when preparing chocolate desserts.
Step 8: Final Blending
Blend the entire mixture for another minute.
The mousse should now be exceptionally smooth.
No graininess should remain.
The texture should resemble a thick chocolate pudding.
The surface should appear glossy and creamy.
Taste once more and adjust sweetness if needed.
Step 9: Filling the Serving Dishes
Prepare serving glasses, ramekins, or dessert bowls.
Using a spoon or piping bag, divide the mousse evenly among the containers.
Smooth the tops with a spoon or offset spatula.
Tap each container gently on the counter.
This helps remove air pockets and creates an even surface.
Step 10: Chilling the Mousse
Cover each serving dish with plastic wrap.
Place in the refrigerator.
Allow the mousse to chill for at least 2 hours.
For the best texture, chill for 4 hours.
During chilling, the mousse firms slightly and develops a richer flavor.
Patience during this step greatly improves the final result.
Preparing Decorative Toppings
While the mousse chills, prepare any desired toppings.
Shave dark chocolate using a vegetable peeler.
Wash and dry fresh berries.
Toast nuts lightly in a dry skillet.
Allow them to cool before chopping.
Prepare whipped cream if desired.
Store all toppings separately until serving time.
Step 11: Decorating the Mousse
Remove the mousse from the refrigerator.
Sprinkle chocolate shavings over the surface.
Add a few fresh berries.
Dust lightly with cocoa powder.
Top with whipped cream if desired.
Scatter chopped nuts for texture.
The contrast between the creamy mousse and crunchy toppings enhances the eating experience.
Serving Suggestions
Serve well chilled.
Pair with fresh strawberries.
Accompany with raspberries.
Serve after dinner as a lighter dessert option.
Enjoy alongside coffee or tea.
Layer with crushed cookies for a parfait-style presentation.
Use as a filling for crepes.
Spread between cake layers.
Serve in elegant glass dishes for entertaining guests.
Storage Instructions
Store covered in the refrigerator.
The mousse remains fresh for up to 4 days.
Keep refrigerated until ready to serve.
Do not leave at room temperature for extended periods.
The texture remains best when served cold.
Make-Ahead Instructions
This dessert is ideal for preparing in advance.
Make the mousse one day before serving.
Allow it to chill overnight.
The flavor becomes even more developed after several hours in the refrigerator.
This makes it perfect for parties and gatherings.
Variations
Peanut Butter Chocolate Mousse
Add ¼ cup natural peanut butter.
Blend until smooth.
Top with chopped peanuts.
Mint Chocolate Mousse
Add ½ teaspoon peppermint extract.
Garnish with chocolate curls.
Orange Chocolate Mousse
Add orange zest.
Include a small amount of orange extract.
The citrus complements the chocolate beautifully.
Mocha Chocolate Mousse
Increase the espresso powder.
Top with chocolate-covered coffee beans.
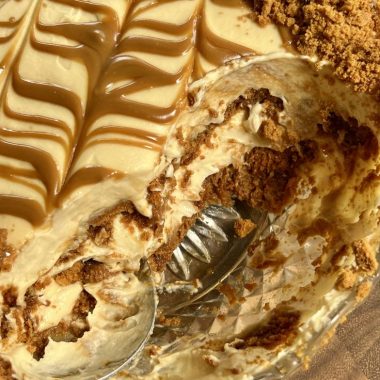
Salted Caramel Chocolate Mousse
Swirl caramel sauce into the mousse.
Finish with flaky sea salt.
Professional Tips for Success
Use full-fat cottage cheese for the creamiest texture.
Blend longer than you think necessary.
Choose high-quality chocolate.
Sift cocoa powder before adding.
Allow melted chocolate to cool slightly.
Chill thoroughly before serving.
Taste frequently and adjust sweetness.
Use a high-powered blender whenever possible.
Do not rush the chilling process.
Serve cold for the best consistency.
Nutritional Benefits
Cottage cheese is naturally rich in protein.
It provides calcium and essential nutrients.
Dark chocolate contains antioxidants.
Cocoa powder contributes additional beneficial plant compounds.
Compared to many traditional chocolate mousses, this version often contains less fat and more protein.
The result is a dessert that is both satisfying and nourishing.
Troubleshooting Guide
Mousse Is Grainy
Blend longer.
Use a higher-powered blender.
Ensure the cottage cheese is processed completely.
Mousse Is Too Thick
Add an additional tablespoon of milk.
Blend again.
Mousse Is Too Thin
Chill longer.
Add a little more melted chocolate.
Blend thoroughly.
Chocolate Seized During Mixing
Allow the chocolate to cool slightly before adding.
Add it gradually while blending.
Conclusion
Cottage Cheese Chocolate Mousse is a remarkably creamy, rich, and satisfying dessert that proves healthy ingredients can create extraordinary results. The smooth cottage cheese base blends seamlessly with cocoa powder, dark chocolate, and natural sweeteners to produce a luxurious mousse with deep chocolate flavor and a velvety texture. Perfect for weeknight treats, meal preparation, special occasions, or elegant dinner parties, this dessert delivers indulgence without excessive heaviness. Once properly chilled and garnished, it becomes a sophisticated chocolate dessert that is sure to impress family, friends, and chocolate lovers alike.