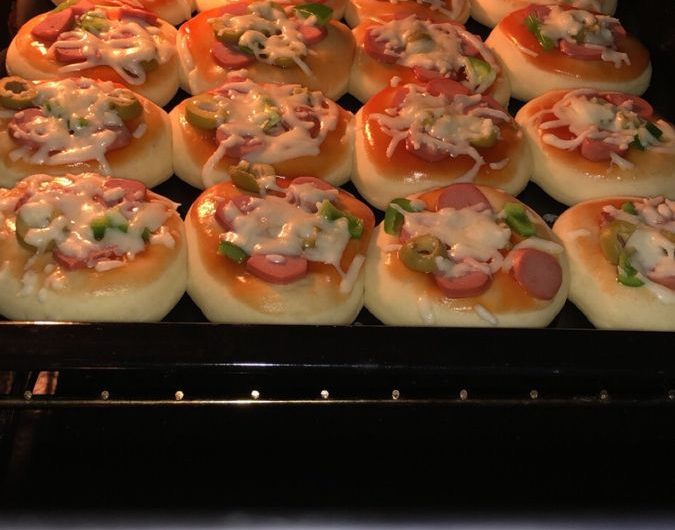
Mini Gluten-Free Pizzas are a delicious, versatile, and family-friendly snack that delivers all the flavor of traditional pizza while remaining completely gluten-free. These individual-sized pizzas feature a soft yet sturdy gluten-free crust topped with rich pizza sauce, melted cheese, and your favorite toppings. They are perfect for lunchboxes, after-school snacks, parties, game nights, appetizers, and casual family meals.
One of the greatest advantages of mini pizzas is their convenience. Their individual size makes them easy to serve and customize. Every person can choose their favorite toppings, making them ideal for gatherings where tastes vary. Despite being gluten-free, these pizzas can achieve a wonderful texture with a tender interior, lightly crisp edges, and enough structure to support generous toppings.
This comprehensive recipe provides detailed instructions for creating bakery-quality Mini Gluten-Free Pizzas from scratch, including dough preparation, proofing, shaping, topping selection, baking techniques, storage, freezing, and professional tips.
Preparation Time: 40 minutes
Rising Time: 1 hour
Assembly Time: 25 minutes
Baking Time: 15 minutes
Total Time: Approximately 2 hours 20 minutes
Yield: 12 to 15 mini pizzas
Difficulty Level: Intermediate
Understanding Gluten-Free Pizza Dough
Traditional pizza dough relies on gluten to provide elasticity and structure.
In gluten-free baking, alternative ingredients must work together to create similar results.
A successful gluten-free pizza crust should be:
Soft inside
Lightly crisp outside
Flexible
Easy to shape
Strong enough to hold toppings
Proper ingredient balance is essential for achieving these characteristics.
Ingredients for the Dough
500 g gluten-free all-purpose flour blend
10 g instant yeast
15 g granulated sugar
8 g salt
1 teaspoon baking powder
2 teaspoons xanthan gum (if not included in flour blend)
2 large eggs
60 ml olive oil
400 ml warm water
2 teaspoons apple cider vinegar
Ingredients for the Pizza Sauce
400 g canned crushed tomatoes
2 tablespoons olive oil
2 cloves garlic, finely minced
1 teaspoon dried oregano
1 teaspoon dried basil
½ teaspoon onion powder
½ teaspoon sugar
½ teaspoon salt
¼ teaspoon black pepper
Ingredients for the Cheese Topping
300 g mozzarella cheese, shredded
100 g cheddar cheese, shredded
50 g parmesan cheese, grated
Optional Toppings
Sliced sausage
Pepperoni
Bell peppers
Green olives
Black olives
Mushrooms
Red onions
Sweet corn
Cooked chicken
Fresh tomatoes
Jalapeños
Spinach
Fresh basil
Selecting the Best Gluten-Free Flour
Not all gluten-free flours perform equally.
A quality blend often contains:
Rice flour
Potato starch
Tapioca starch
Corn starch
Sorghum flour
The combination creates a balanced texture and flavor.
Commercial gluten-free flour blends generally provide the most reliable results.
The Importance of Xanthan Gum
Xanthan gum helps replace gluten’s binding properties.
It contributes:
Elasticity
Structure
Moisture retention
Improved texture
Many gluten-free flour blends already contain xanthan gum.
Check the package before adding extra.
Preparing the Pizza Sauce
Heat olive oil in a saucepan over medium heat.
Add garlic.
Cook briefly until fragrant.
Add:
Crushed tomatoes
Oregano
Basil
Onion powder
Sugar
Salt
Black pepper
Stir thoroughly.
Simmer gently for 20 minutes.
The sauce should become thicker and more concentrated.
Allow it to cool completely before using.
Mixing the Dough
In a large mixing bowl combine:
Gluten-free flour
Yeast
Sugar
Salt
Baking powder
Xanthan gum
Whisk thoroughly.
Even distribution is important.
In another bowl combine:
Warm water
Eggs
Olive oil
Apple cider vinegar
Whisk until combined.
Gradually add the liquid mixture to the dry ingredients.
Mix thoroughly.
Unlike traditional bread dough, gluten-free dough resembles a thick batter.
This consistency is normal.
Kneading Gluten-Free Dough
Gluten-free dough does not require traditional kneading.
Instead, mix thoroughly for approximately 4 to 5 minutes.
This allows the ingredients to hydrate fully.
The dough should become smooth and cohesive.
First Rise
Transfer the dough into a lightly oiled bowl.
Cover with plastic wrap or a clean towel.
Allow it to rise in a warm location.
The dough should increase noticeably in volume.
This process usually takes 60 minutes.
Preparing the Baking Trays
Line baking trays with parchment paper.
Lightly grease the parchment.
This helps prevent sticking.
Dividing the Dough
Once risen, divide the dough into 12 to 15 portions.
Wet your hands lightly.
Gluten-free dough is easier to handle with slightly damp hands.
Shape each portion into a smooth ball.
Forming the Mini Pizza Bases
Place each dough ball onto the prepared tray.
Flatten gently using your fingers.
Create rounds approximately 10 to 12 cm in diameter.
The edges can be slightly thicker than the center.
This creates a traditional pizza appearance.
Pre-Baking the Crusts
Preheat the oven to 220°C.
Bake the plain crusts for approximately 8 minutes.
This step improves structure and prevents sogginess.
The crusts should appear lightly set but not fully browned.
Remove from the oven.
Allow them to cool slightly.
Adding the Sauce
Spread a thin layer of pizza sauce onto each crust.
Leave a small border around the edge.
Avoid excessive sauce.
Too much moisture can soften the crust.
Adding Cheese
Sprinkle mozzarella evenly over each pizza.
Add cheddar and parmesan.
The combination creates excellent flavor and melting qualities.
Adding Toppings
Arrange toppings evenly.
Popular combinations include:
Sausage and cheese
Pepperoni and olives
Chicken and peppers
Mushroom and onion
Vegetable medley
Avoid overloading the pizzas.
Excess toppings can affect baking and texture.
Final Baking
Return the pizzas to the oven.
Bake for approximately 10 to 15 minutes.
The cheese should melt completely.
The crust edges should become lightly golden.
The toppings should be heated through.
Cooling
Allow the pizzas to rest for several minutes before serving.
This helps the cheese settle and improves handling.
Understanding Perfect Texture
A properly made Mini Gluten-Free Pizza should have:
Soft interior
Lightly crisp bottom
Golden edges
Melted cheese
Flavorful toppings
Stable structure
The crust should hold together while remaining tender.
Margherita Variation
Top with:
Mozzarella
Fresh basil
Tomato sauce
Parmesan
This simple version highlights the quality of the ingredients.
Sausage Pizza Variation
Add sliced sausage.
Include onions and peppers.
The savory sausage pairs wonderfully with the mild crust.
Chicken Pizza Variation
Use cooked chicken.
Add sweet corn and mozzarella.
This creates a hearty and satisfying meal.
Vegetable Pizza Variation
Use:
Bell peppers
Olives
Mushrooms
Onions
Spinach
This colorful option offers excellent flavor and texture.
Breakfast Pizza Variation
Top with:
Scrambled eggs
Cheese
Breakfast sausage
This makes an excellent morning meal.
Four Cheese Variation
Combine:
Mozzarella
Cheddar
Parmesan
Gouda
The result is rich, creamy, and indulgent.
Mediterranean Variation
Use:
Olives
Feta cheese
Roasted peppers
Fresh herbs
This version offers vibrant flavor.
Professional Tips
Measure ingredients carefully.
Use quality gluten-free flour.
Allow adequate rising time.
Pre-bake the crusts.
Do not overload with toppings.
Use freshly grated cheese.
Bake at high temperature.
Allow brief cooling before serving.
Store properly.
Practice shaping techniques.
Common Mistakes and Solutions
Crust Is Too Dense
The dough may not have risen sufficiently.
Allow more proofing time.
Crust Falls Apart
Additional xanthan gum may be required.
Ensure accurate measurements.
Soggy Center
Use less sauce.
Pre-bake the crust thoroughly.
Dry Crust
Avoid overbaking.
Store properly after cooling.
Uneven Baking
Rotate trays during baking.
Ensure consistent crust thickness.
Storage Instructions
Store leftover pizzas in airtight containers.
Refrigerate for up to three days.
Reheat before serving.
Freezing Instructions
Cool completely.
Wrap individually.
Freeze for up to three months.
Thaw overnight in the refrigerator.
Reheat in a hot oven.
Reheating Methods
Oven:
190°C for 8 minutes
Air Fryer:
180°C for 4 to 5 minutes
Toaster Oven:
5 to 7 minutes
The oven generally produces the best texture.
Serving Suggestions
Serve with fresh salad.
Pair with soup.
Offer alongside dipping sauces.
Include in lunchboxes.
Serve at birthday parties.
Present as appetizers.
Arrange on buffet tables.
Use for family movie nights.