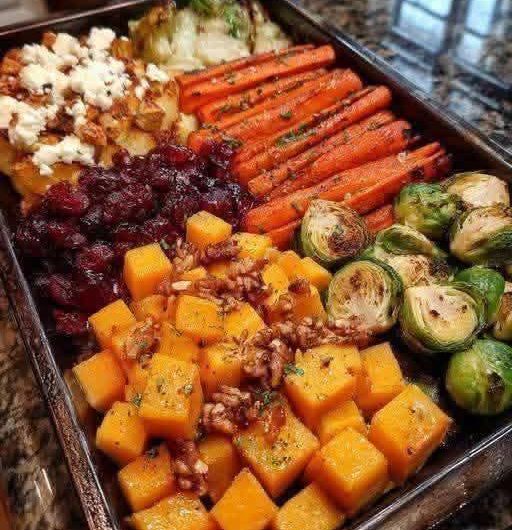
Caramelized Butternut Squash
An Extensive, Technique-Focused Guide
1. Understanding the Dish
Caramelized butternut squash is not just roasted squash. It is the result of a controlled cooking process where natural sugars in the squash undergo caramelization, producing deeper flavor, richer color, and a slightly crisp exterior.
The objective is to achieve three things at the same time:
- A soft, creamy interior
- A golden to deep brown exterior
- A balanced flavor that is naturally sweet but not overly sugary
Achieving all three consistently requires attention to preparation, heat, spacing, and timing.
2. Selecting the Best Butternut Squash
What to Look For
- A firm squash with no soft spots
- Even beige color without dark patches
- A heavy feel for its size (indicates good moisture content)
- A long neck with a smaller seed cavity (more usable flesh)
Why Selection Matters
Better squash means:
- More natural sugars
- Better texture after roasting
- More consistent caramelization
3. Ingredient List (Expanded with Purpose)
Core Ingredients
- 1 medium butternut squash (1–1.2 kg)
- 2 to 3 tablespoons olive oil
- 1 teaspoon salt
- ½ teaspoon black pepper
Optional Flavor Builders
These are not required, but each changes the profile of the dish:
Sweet Enhancers
- Brown sugar
- Maple syrup
These accelerate browning and deepen caramel notes.
Aromatic Additions
- Garlic (adds depth)
- Onion powder (adds subtle sweetness)
Herbs
- Thyme (earthy and light)
- Rosemary (strong and pine-like)
Spices
- Cinnamon (warm sweetness)
- Paprika (mild smokiness)
- Chili flakes (heat contrast)
4. Preparation in Detail
Step 1: Stabilizing the Squash
Before cutting, slice a small piece off the bottom so the squash sits flat on the board. This prevents slipping and improves safety.
Step 2: Peeling Properly
Use a sharp vegetable peeler.
Peel in long strokes from top to bottom. Remove all skin, as it remains tough even after cooking.
Step 3: Cutting Technique
Cut into two main sections:
- Neck (solid flesh)
- Base (contains seeds)
Remove seeds from the base using a spoon.
Then cut into uniform cubes.
Ideal Size:
2 to 3 cm cubes
Why size matters:
- Smaller cubes cook faster but may burn
- Larger cubes stay soft but may not caramelize enough
Step 4: Drying Thoroughly
Spread the cubes on a cloth or paper towel and gently pat dry.
Even slight moisture can prevent browning and result in steaming.
5. Seasoning Strategy
Place the squash in a large bowl.
Add oil first and mix. Oil acts as a carrier for seasoning and helps distribute heat evenly.
Then add:
- Salt
- Pepper
- Optional ingredients
Mix until every piece is evenly coated.
Key principle:
Every surface should have a thin, even layer of oil, not excessive coating.
6. Oven Roasting: The Core Method
Step 1: Preheating
Preheat oven to 200°C.
Do not skip this step. Putting squash into a cold oven leads to uneven cooking.
Step 2: Tray Preparation
Line a tray with parchment paper if available.
Spread squash in a single layer.
Critical Rule:
No overlapping and minimal touching.
This allows hot air to circulate and promotes caramelization instead of steaming.
Step 3: First Roasting Phase (20 Minutes)
Place tray in the center of the oven.
During this phase:
- Squash begins to soften
- Moisture starts evaporating
- Edges begin to dry
Do not stir too early.
Step 4: Turning the Pieces
After 20 minutes, remove the tray and flip the pieces.
This ensures even browning on multiple sides.
Step 5: Second Roasting Phase (15–20 Minutes)
Return to oven.
Now caramelization becomes more visible:
- Golden edges deepen in color
- Sugars begin to concentrate
Step 6: Final Browning Adjustment
For deeper color:
- Move tray to upper rack
- Increase heat slightly if needed
Watch carefully to prevent burning.
7. Sensory Indicators of Doneness
Instead of relying only on time, observe:
Visual
- Deep golden to brown edges
- Slight crisping on corners
Texture
- Soft interior when pierced
- Exterior slightly firm
Aroma
- Sweet, nutty, roasted smell
8. Advanced Techniques
Technique 1: Double Roasting
Roast once, cool slightly, then roast again briefly.
Result:
- Extra crisp edges
- More concentrated flavor
Technique 2: Late Glazing
Add maple syrup or sugar in the last 10 minutes instead of the beginning.
Result:
- Prevents burning
- Creates a glossy finish
Technique 3: High-Heat Finish
A short burst at higher temperature at the end enhances browning without overcooking the interior.
9. Flavor Balancing
If Too Sweet
Add a small pinch of salt or a splash of vinegar.
If Too Bland
Increase salt slightly or add herbs.
If Too Soft
Roast longer at slightly higher heat.
10. Serving Ideas
Caramelized butternut squash is versatile.
It works well with:
- Grain bowls
- Roasted meats
- Pasta
- Salads
It can also be mashed slightly and used as a base for other dishes.
11. Storage and Reuse
Refrigeration
Store in airtight container for up to 3 days.
Reheating
Use oven or pan to restore texture.
Creative Reuse
- Add to soups
- Blend into sauces
- Mix into rice dishes
12. Common Problems and Solutions
Problem: No Browning
Cause: Too much moisture or overcrowding
Solution: Dry thoroughly and space properly
Problem: Burnt Edges
Cause: Excess sugar or high heat too early
Solution: Add sweeteners later
Problem: Mushy Texture
Cause: Overcooking
Solution: Reduce cooking time and check earlier
13. Final Thoughts
Mastering Caramelized Butternut Squash comes down to control—control of moisture, heat, spacing, and timing. Each step contributes to the final result.
When done correctly, the dish delivers:
- Deep natural sweetness
- Balanced flavor
- Rich golden color
- Tender yet structured texture
It is simple in ingredients but refined in execution, making it an excellent example of technique-driven cooking.