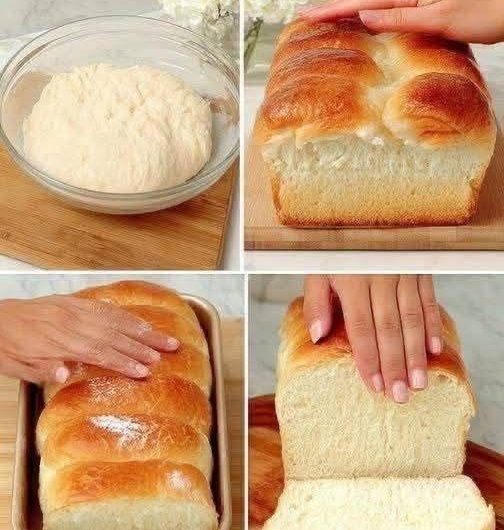
Heavenly Cloud Loaf is known for its extremely soft texture, light structure, and delicate crumb. When made correctly, it should feel almost weightless in your hands and tear apart easily into soft strands. This texture comes from proper gluten development, correct yeast activity, and careful proofing.
This is not a rushed recipe. The softness of the bread depends on patience, gentle handling, and attention to detail. Every stage builds toward the final result.
INGREDIENTS WITH FULL UNDERSTANDING
Flour (3 cups all-purpose flour / maida):
Flour is the main structure of the bread. It contains proteins that form gluten when mixed with liquid. Gluten is what gives bread its elasticity and chew. Using good quality flour improves texture significantly.
Yeast (2¼ teaspoons active dry yeast):
Yeast is a living organism. It feeds on sugar and produces gas. This gas creates bubbles inside the dough, making the bread rise and become fluffy.
Sugar (¼ cup total):
Sugar serves two purposes. It adds mild sweetness and also feeds the yeast during activation, helping it grow and work properly.
Salt (1 teaspoon):
Salt strengthens the gluten structure and enhances flavor. Without salt, bread tastes flat and the dough becomes weak.
Milk powder (2 tablespoons, optional):
Milk powder enriches the dough, making it softer and slightly creamy in taste. It also helps improve browning.
Warm milk (¾ cup):
Milk adds softness and richness. It should always be lukewarm. Too hot will damage yeast; too cold will slow fermentation.
Warm water (¼ cup):
Water activates yeast and hydrates the flour. Again, temperature is important.
Egg (1, room temperature):
Egg adds richness, softness, and structure. It also contributes to color.
Butter (2 tablespoons, softened):
Butter makes the bread tender and flavorful. It should be added during kneading, not at the beginning.
STEP 1: ACTIVATING THE YEAST IN DETAIL
Take a small bowl. Add the warm water, then a small portion of sugar, and then sprinkle the yeast on top.
Let it sit undisturbed for 5 to 10 minutes.
During this time, the yeast absorbs liquid, wakes up, and begins feeding on sugar. This produces carbon dioxide gas, which appears as foam.
If you see a thick, bubbly, slightly frothy layer, your yeast is active and ready.
If nothing happens, the yeast is either expired or the liquid was too hot or too cold. In that case, the process must be restarted.
This step is essential because it confirms that your bread will rise later.
STEP 2: FORMING THE INITIAL DOUGH
In a large mixing bowl, combine flour, remaining sugar, salt, and milk powder. Mix thoroughly so that all dry ingredients are evenly distributed.
Make a space in the center and pour in the yeast mixture, warm milk, and egg.
Begin mixing slowly. At first, the dough will look sticky and uneven. Continue mixing until no dry flour remains.
At this stage, the dough is rough and not yet developed. That is expected.
STEP 3: KNEADING AND GLUTEN DEVELOPMENT
Transfer the dough to a flat surface.
Start kneading using a consistent motion:
Push the dough forward with your palm, fold it back toward you, rotate slightly, and repeat.
Kneading should continue for about 10 to 15 minutes.
After a few minutes, begin adding softened butter in small portions. Allow each addition to fully absorb before adding more.
Initially, the dough may become sticky again after adding butter. Keep kneading. Over time, it will come together.
What is happening here is gluten development. The proteins in the flour are aligning and forming a network. This network traps gas produced by yeast, which is what creates the airy structure.
By the end of kneading, the dough should be smooth, soft, elastic, and slightly tacky but not overly sticky.
Perform the windowpane test:
Take a small piece of dough and stretch it gently. If it forms a thin, almost transparent layer without tearing, the gluten is well developed.
STEP 4: FIRST PROOFING (FERMENTATION PHASE)
Place the dough into a lightly greased bowl.
Cover it with a cloth or plastic wrap to prevent drying.
Let it rest in a warm, draft-free area for 1 to 2 hours.
During this time, yeast ferments sugars and produces gas. The dough expands and develops flavor.
The dough should double in size. This indicates proper fermentation.
Temperature plays a major role. In warmer conditions, this step is faster. In cooler environments, it may take longer.
STEP 5: DE-GASSING AND STRUCTURE RESET
Once the dough has doubled, gently press it down. This releases excess gas and redistributes yeast.
This step ensures even texture in the final bread and prevents overly large air pockets.
Do not aggressively punch or tear the dough. Handle it gently.
STEP 6: SHAPING WITH PRECISION
Transfer the dough back to your work surface.
Flatten it slightly into a rectangle shape.
Roll it tightly into a log. Tight rolling helps create a uniform crumb structure.
Pinch the seam closed.
Place the shaped dough into a greased loaf pan with the seam side down.
Proper shaping ensures even rising and a neat final appearance.
STEP 7: SECOND PROOFING (FINAL RISE)
Cover the loaf pan again.
Let the dough rise for 30 to 45 minutes.
During this stage, the dough becomes puffy and light again. This final rise determines the softness of the bread.
The dough should rise to just above the edge of the pan.
If over-proofed, it may collapse during baking. If under-proofed, it will be dense.
STEP 8: BAKING WITH CONTROL
Preheat the oven to 180°C (350°F).
Before baking, brush the top gently with the egg yolk and milk mixture. This creates a shiny, golden crust.
Place the loaf in the middle rack.
Bake for 25 to 30 minutes.
During baking, heat causes rapid expansion (oven spring), then the structure sets as proteins and starches firm up.
The bread is done when:
The top is golden brown
The loaf sounds hollow when tapped
The internal structure is fully set
STEP 9: COOLING AND FINISHING
Remove the bread from the oven and immediately brush with butter.
Let it cool in the pan for a few minutes, then transfer to a rack.
Cooling allows steam to escape and prevents sogginess.
Do not cut immediately. Wait at least 10 to 15 minutes.
FINAL RESULT AND TEXTURE
A properly made Heavenly Cloud Loaf will be:
Soft and airy
Light in weight
Easy to pull apart
Slightly sweet and rich
Moist but not sticky
COMMON PROBLEMS AND THEIR CAUSES
Dense bread usually means insufficient kneading or weak yeast.
Dry bread often comes from adding too much flour.
Collapsed bread is usually due to over-proofing.
No rise indicates inactive yeast or incorrect temperature.
ADVANCED TIPS FOR BEST RESULTS
Use room temperature ingredients to ensure even mixing.
Avoid adding too much flour during kneading. Slight stickiness is good.
Always monitor dough visually rather than relying only on time.
Practice improves consistency.
VARIATIONS AND EXTENSIONS
You can turn this into a filled loaf by adding chocolate, cream, or jam before shaping.
For a savory version, incorporate cheese, herbs, or garlic.
For extra softness, you can experiment with tangzhong (a cooked flour paste method used in Japanese milk bread).