Chocolate Mousse
Chocolate mousse is one of the most elegant and luxurious desserts in the world. It is rich yet light, creamy yet airy, and intensely chocolatey while still feeling delicate on the palate. A properly made chocolate mousse has a silky smooth texture that melts slowly in the mouth and delivers deep chocolate flavor in every spoonful.
The best part about this dessert is that it can be made with only a few ingredients while still tasting sophisticated and restaurant-quality. Despite its luxurious appearance, chocolate mousse is surprisingly simple when the technique is understood properly.
This detailed recipe explains every part carefully, including:
- Ingredient selection
- Chocolate melting techniques
- Whipping methods
- Texture development
- Chilling process
- Serving ideas
- Troubleshooting mistakes
- Professional dessert tips
- Flavor variations
- Storage methods
The recipe is intentionally written in a very long, highly readable, and detailed format so that even beginners can create a perfectly smooth and airy chocolate mousse at home.
Introduction to Chocolate Mousse
Chocolate mousse originated in France and became one of the most celebrated chocolate desserts worldwide. The word “mousse” means “foam” in French, which perfectly describes the dessert’s airy texture.
Traditional chocolate mousse combines:
- Melted chocolate
- Cream
- Eggs or whipped cream
- Sugar
When these ingredients are combined properly, they create a dessert that feels rich without being heavy.
The beauty of mousse lies in texture contrast:
- Smooth and creamy
- Light and airy
- Rich but delicate
Even with only a few ingredients, technique plays a major role in achieving professional results.
Why This Recipe Is Special
This recipe focuses on simplicity while still producing bakery-quality results.
The mousse requires only a handful of ingredients yet delivers:
- Deep chocolate flavor
- Silky consistency
- Airy texture
- Glossy appearance
- Rich aroma
- Balanced sweetness
Unlike complicated pastry recipes, this mousse can be prepared in a home kitchen without advanced equipment.
Preparation Details
Preparation Time
25 minutes
Chilling Time
4 to 6 hours
Total Time
Approximately 6 hours
Yield
Serves 4 to 6 people depending on portion size.
Ingredients
This recipe intentionally uses only a few ingredients.
Main Ingredients
- 200 grams dark chocolate
- 2 cups heavy cream
- 3 tablespoons sugar
- 1 teaspoon vanilla extract
- Pinch of salt
Optional Ingredients
These are optional but can enhance flavor.
- Instant coffee powder
- Cocoa powder
- Chocolate shavings
- Fresh berries
- Sea salt flakes
Understanding Each Ingredient
Chocolate
Chocolate is the heart of the dessert.
The quality of chocolate directly affects:
- Flavor
- Texture
- Aroma
- Sweetness
- Smoothness
Using high-quality chocolate creates dramatically better mousse.
Best Chocolate Percentage
Dark chocolate between 60% and 70% cocoa works best.
This provides:
- Rich flavor
- Balanced bitterness
- Smooth texture
- Stable structure
Milk chocolate creates sweeter mousse while very dark chocolate creates stronger intensity.
Heavy Cream
Heavy cream creates the mousse’s airy structure.
Whipped cream traps air which gives mousse its signature lightness.
Cold cream whips best.
Sugar
Sugar balances bitterness and improves texture.
The amount can be adjusted depending on chocolate sweetness.
Vanilla Extract
Vanilla deepens chocolate flavor and adds warmth.
Even a small amount improves overall aroma significantly.
Salt
A tiny pinch of salt enhances chocolate complexity.
Salt does not make the dessert salty.
Instead, it sharpens flavor balance.
Equipment Needed
- Mixing bowls
- Heatproof bowl
- Whisk
- Spatula
- Electric mixer optional
- Serving glasses or ramekins
Importance of Temperature Control
Temperature is extremely important when making mousse.
Chocolate that becomes too hot can seize.
Cream that becomes too warm may not whip properly.
Balanced temperatures create smooth texture.
Step 1 – Chop the Chocolate
Finely chop the dark chocolate.
Smaller pieces melt more evenly and reduce overheating risk.
Place chopped chocolate into a heatproof bowl.
Why Finely Chopped Chocolate Matters
Large chunks melt unevenly.
Uneven melting can create:
- Grainy texture
- Burned chocolate
- Lumps
Small pieces melt smoothly and quickly.
Step 2 – Melt the Chocolate
There are two common methods.
Double Boiler Method
Place bowl over simmering water.
The bowl should not touch the water.
Stir gently until fully melted.
Microwave Method
Heat in short intervals of 15 to 20 seconds.
Stir between each interval.
Avoid overheating.
Understanding Chocolate Melting
Chocolate contains cocoa butter which melts delicately.
Excessive heat can destroy texture.
Perfectly melted chocolate should appear:
- Glossy
- Smooth
- Fluid
Step 3 – Cool the Chocolate Slightly
After melting, let chocolate cool for several minutes.
It should remain fluid but not extremely hot.
Hot chocolate can collapse whipped cream later.
Step 4 – Whip the Cream
Pour cold heavy cream into chilled bowl.
Add:
- Sugar
- Vanilla extract
- Pinch of salt
Whip until soft peaks form.
What Are Soft Peaks
Soft peaks occur when whipped cream holds shape gently but tips still bend.
Overwhipped cream creates grainy mousse.
Underwhipped cream creates weak mousse structure.
Why Cold Cream Whips Better
Cold temperatures help fat molecules stabilize trapped air.
This creates:
- Better volume
- Improved structure
- Smoother texture
Warm cream struggles to whip properly.
Step 5 – Combine Chocolate and Cream
Add a small amount of whipped cream into melted chocolate first.
Mix gently.
This lightens the chocolate mixture.
Then gradually fold remaining whipped cream into chocolate.
Understanding Folding Technique
Folding means combining mixtures gently without removing trapped air.
Use a spatula.
Move from bottom upward in slow motions.
Do not stir aggressively.
Aggressive mixing destroys air bubbles and creates dense mousse.
Texture During Folding
At first the mixture may appear streaky.
Continue folding gently until fully combined.
The mousse should become:
- Smooth
- Light
- Uniform
- Silky
Step 6 – Transfer to Serving Glasses
Spoon mousse into:
- Dessert glasses
- Bowls
- Cups
- Ramekins
Smooth tops if desired.
Step 7 – Chill the Mousse
Refrigerate for at least 4 hours.
Overnight chilling creates even better texture.
During chilling the mousse becomes:
- Firmer
- Richer
- More stable
- More flavorful
Why Chilling Is Essential
Fresh mousse is soft and loose.
Cold temperatures stabilize fats and structure.
This creates classic mousse consistency.
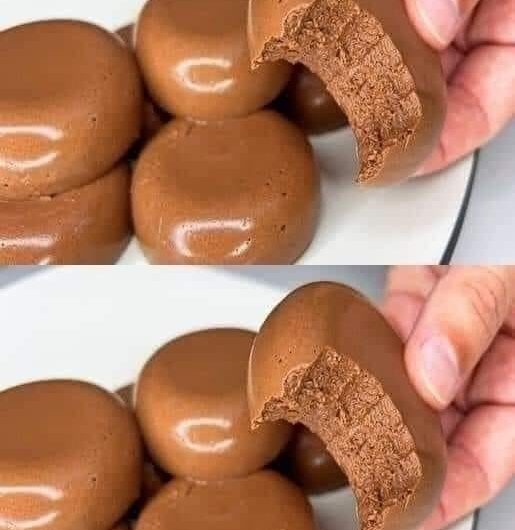
Final Texture of Perfect Chocolate Mousse
A successful mousse should feel:
- Airy
- Creamy
- Smooth
- Rich
- Delicate
It should melt slowly in the mouth without feeling heavy.
Serving Suggestions
Chocolate mousse can be served simply or elegantly.
Popular toppings include:
- Cocoa powder
- Chocolate curls
- Fresh berries
- Whipped cream
- Crushed nuts
- Caramel drizzle
Pairing Suggestions
Chocolate mousse pairs beautifully with:
- Coffee
- Espresso
- Cappuccino
- Fresh strawberries
- Vanilla ice cream
- Raspberry sauce
Professional Chocolate Mousse Tips
Use High-Quality Chocolate
The dessert depends heavily on chocolate flavor.
Cheap chocolate creates dull results.
Avoid Water Contact
Even tiny water droplets can seize chocolate.
Keep equipment dry.
Fold Gently
Preserving air creates mousse texture.
Overmixing creates heaviness.
Chill Thoroughly
Insufficient chilling weakens structure.
Taste Before Chilling
Adjust sweetness before refrigeration.
Common Mistakes and Solutions
Grainy Texture
Cause:
Overheated chocolate.
Solution:
Melt slowly using low heat.
Dense Mousse
Cause:
Overmixing or collapsed cream.
Solution:
Fold gently.
Runny Mousse
Cause:
Underwhipped cream or insufficient chilling.
Solution:
Whip properly and chill longer.
Seized Chocolate
Cause:
Water contamination or overheating.
Solution:
Use dry bowls and controlled heat.
Overly Bitter Mousse
Cause:
Chocolate percentage too high.
Solution:
Use slightly sweeter chocolate.
Understanding Chocolate Types
Dark Chocolate
Creates rich intense flavor.
Most popular choice.
Milk Chocolate
Sweeter and creamier.
Produces softer mousse.
White Chocolate
Very sweet and buttery.
Requires less sugar.
Bittersweet Chocolate
Provides strong cocoa flavor.
Excellent for sophisticated desserts.
Variations of Chocolate Mousse
Coffee Chocolate Mousse
Add instant espresso powder.
Coffee intensifies chocolate flavor.
Orange Chocolate Mousse
Add orange zest.
Creates fresh citrus contrast.
Mint Chocolate Mousse
Add mint extract carefully.
Produces refreshing flavor.
Salted Chocolate Mousse
Top with sea salt flakes.
Enhances chocolate richness.
Spicy Chocolate Mousse
Add cinnamon or chili powder.
Creates warmth and complexity.
Layered Dessert Ideas
Chocolate mousse works beautifully in layered desserts.
Combine with:
- Cake crumbs
- Brownies
- Crushed cookies
- Fruit compote
- Whipped cream
Restaurant-Style Presentation
For elegant presentation:
Use glass cups.
Pipe mousse neatly.
Add chocolate curls.
Dust lightly with cocoa powder.
Serve chilled.
Storage Instructions
Refrigerator
Store covered for up to 3 days.
Freezer
Can be frozen for firmer texture.
Thaw slightly before serving.
Why Chocolate Mousse Is So Popular
Chocolate mousse remains globally loved because it combines:
- Simplicity
- Elegance
- Rich flavor
- Luxurious texture
- Versatility
It feels sophisticated while requiring relatively few ingredients.
Nutritional Notes
Chocolate mousse is rich and indulgent.
Portion size matters because of:
- Cream content
- Chocolate richness
- Sugar
Dark chocolate versions generally contain deeper cocoa flavor and less sweetness.
The Science Behind Mousse Texture
Mousse texture depends on trapped air.
Whipped cream creates tiny air bubbles.
Chocolate stabilizes structure.
Cold temperatures firm the mixture.
This creates the signature airy consistency.
Importance of Patience
Rushing mousse preparation can ruin texture.
Patience improves:
- Smoothness
- Stability
- Flavor
- Appearance
Slow careful folding creates the best results.
Homemade vs Restaurant Mousse
Homemade mousse often tastes fresher because:
- Ingredients are freshly prepared
- Artificial stabilizers are absent
- Flavor can be customized
Restaurant mousse may focus more on presentation while homemade mousse often emphasizes richness and freshness.
Best Occasions for Chocolate Mousse
Chocolate mousse is ideal for:
- Dinner parties
- Birthdays
- Romantic dinners
- Family gatherings
- Holiday desserts
- Elegant celebrations
Final Presentation
A perfectly prepared chocolate mousse should appear:
- Glossy
- Smooth
- Airy
- Rich brown in color
- Light yet creamy
The spoon should glide smoothly through the dessert while maintaining structure.
The aroma should smell deeply chocolatey with warm cocoa notes.
Conclusion
Chocolate mousse proves that a luxurious dessert does not require dozens of ingredients or complicated pastry techniques. With only a few carefully handled ingredients, it is possible to create a dessert that feels elegant, rich, airy, and deeply satisfying.
The key lies in proper chocolate melting, gentle folding, balanced whipping, and sufficient chilling. When these techniques are followed carefully, the result is a silky smooth chocolate mousse that rivals professional restaurant desserts.
Whether served casually at home or presented elegantly for guests, chocolate mousse remains one of the most timeless and beloved chocolate desserts ever created.