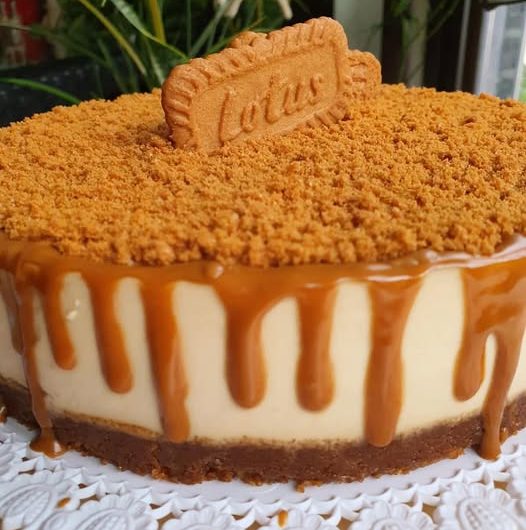
A Lotus Biscoff Cake is one of the richest and most luxurious desserts you can make at home. It combines soft buttery sponge layers with the deep caramelized flavor of Lotus biscuits and creamy cookie butter frosting. The taste is smooth, slightly spiced, buttery, and intensely comforting. Every layer melts in the mouth while the biscuit crumbs add a delicate crunch that makes the texture unforgettable.
This detailed recipe is written carefully with complete explanations, professional baking tips, troubleshooting guidance, decoration ideas, storage instructions, and serving suggestions so that you can create a bakery-style Lotus cake from scratch with confidence.
This recipe is intentionally very detailed and easy to read so every step is clear and understandable.
Introduction to Lotus Biscoff Cake
Lotus Biscoff biscuits are famous for their warm caramel flavor and crisp texture. Originally served alongside coffee, they became popular worldwide because of their unique taste. The spread made from these biscuits transformed desserts completely and became one of the most loved ingredients in cakes, cheesecakes, milkshakes, cupcakes, and pastries.
A Lotus Biscoff Cake combines several delicious elements:
- Moist vanilla sponge
- Crushed caramel biscuits
- Creamy cookie butter frosting
- Melted Biscoff drip topping
- Crunchy biscuit decoration
The result is a rich layered cake that feels elegant and indulgent while still being simple enough to make at home.
This cake is suitable for:
- Birthday celebrations
- Eid gatherings
- Dinner parties
- Tea-time desserts
- Wedding dessert tables
- Family events
- Special occasions
- Café-style presentations
Preparation Details
Preparation Time
45 minutes
Baking Time
30 to 35 minutes
Cooling Time
1 to 2 hours
Decorating Time
30 minutes
Total Time
Approximately 3 to 4 hours
Serving Size
This recipe serves approximately 10 to 12 people generously.
If sliced thinner, it can serve up to 14 people.
Flavor Profile
This cake has:
- Deep caramelized biscuit flavor
- Soft buttery sponge texture
- Smooth creamy frosting
- Slight cinnamon and brown sugar notes
- Balanced sweetness
- Rich bakery-style aroma
The flavor becomes even better after chilling because the biscuit and frosting flavors settle beautifully together.
Ingredients
Ingredients for the Sponge Cake
- 2 and 1/2 cups all-purpose flour
- 2 teaspoons baking powder
- 1/2 teaspoon baking soda
- 1/2 teaspoon salt
- 1 cup unsalted butter, softened
- 1 and 1/2 cups caster sugar
- 4 large eggs
- 1 tablespoon vanilla extract
- 1 cup whole milk
- 1/2 cup sour cream or plain yogurt
- 1 cup finely crushed Lotus Biscoff biscuits
Ingredients for the Buttercream Frosting
- 1 cup unsalted butter, softened
- 3 and 1/2 cups powdered sugar
- 1 cup Lotus Biscoff spread
- 2 to 3 tablespoons heavy cream
- 1 teaspoon vanilla extract
- Pinch of salt
Ingredients for Filling and Decoration
- 1 cup Lotus Biscoff spread
- 10 to 15 Lotus biscuits
- Extra crushed biscuits
- White chocolate curls optional
- Whipped cream optional
Equipment Needed
Having proper equipment makes baking easier and improves final results.
You will need:
- Two 8-inch cake pans
- Large mixing bowls
- Electric hand mixer or stand mixer
- Silicone spatula
- Measuring cups and spoons
- Cooling rack
- Offset spatula
- Cake stand or serving plate
- Sieve for dry ingredients
- Sharp knife for slicing
Understanding the Ingredients
Flour
All-purpose flour gives structure to the cake.
Too much flour can create a dry and heavy sponge.
Always measure carefully.
Butter
Butter creates richness and softness.
Use unsalted butter so you can control the salt level.
Softened butter creams properly with sugar and traps air inside the batter.
Eggs
Eggs provide structure, moisture, and stability.
Room-temperature eggs mix more evenly into the batter.
Sour Cream or Yogurt
This ingredient creates softness and moisture.
It also gives a slight tang that balances the sweetness.
Lotus Biscoff Biscuits
These biscuits provide the signature caramelized flavor.
Crushing them finely allows the flavor to spread evenly through the sponge.
Biscoff Spread
The spread gives intense cookie butter flavor.
It creates creamy frosting and glossy drips.
Step-by-Step Cake Preparation
Step 1 – Prepare the Oven and Cake Pans
Preheat the oven to 175°C or 350°F.
Proper oven temperature is extremely important.
If the oven is too hot:
- The cake rises too quickly
- The outside browns early
- The center may remain uncooked
If the oven is too cool:
- The cake becomes dense
- Rising becomes uneven
Grease two 8-inch cake pans with butter or oil.
Line the bottoms with parchment paper.
Dust lightly with flour if desired.
This preparation helps the cakes release smoothly after baking.
Step 2 – Crush the Lotus Biscuits
Place Lotus biscuits into a food processor and blend until fine crumbs form.
If you do not have a processor:
- Put biscuits into a sealed bag
- Crush using a rolling pin
The crumbs should be fine rather than chunky.
Large pieces may affect the cake texture.
Set the crumbs aside.
Step 3 – Mix the Dry Ingredients
In a large bowl combine:
- Flour
- Baking powder
- Baking soda
- Salt
Whisk thoroughly.
Whisking distributes the raising agents evenly and prevents lumps.
Now add the crushed biscuit crumbs.
Mix until fully combined.
The mixture should smell sweet and caramelized.
Step 4 – Cream Butter and Sugar
This is one of the most important stages in cake baking.
Place softened butter into a mixing bowl.
Beat for about 2 minutes until smooth.
Gradually add sugar while mixing continuously.
Beat the mixture for 4 to 5 minutes.
The texture should become:
- Pale
- Creamy
- Fluffy
- Light
This process traps air into the batter which helps create a soft sponge.
Under-creaming results in dense cake layers.
Step 5 – Add the Eggs
Add eggs one at a time.
Beat well after every addition.
Adding eggs slowly prevents curdling.
Once all eggs are incorporated, add vanilla extract.
The batter should now appear silky and smooth.
Step 6 – Combine Wet and Dry Mixtures
Add dry ingredients gradually.
Alternate with milk.
Use this order:
- Dry ingredients
- Milk
- Dry ingredients
- Milk
- Dry ingredients
Mix gently after each addition.
Finally fold in sour cream or yogurt.
Avoid overmixing.
Overmixing develops gluten and creates a heavy cake.
The final batter should be thick but smooth.
Step 7 – Fill the Cake Pans
Divide the batter evenly between the prepared pans.
Use a spatula to level the tops.
Tap the pans gently on the counter to remove air bubbles.
Step 8 – Bake the Cakes
Place pans into the preheated oven.
Bake for 30 to 35 minutes.
Do not open the oven too early because sudden temperature drops can collapse the cake.
The cakes are done when:
- Tops are golden
- Centers spring back lightly
- Toothpick comes out clean
Remove from the oven carefully.
Let cakes cool inside the pans for 10 minutes.
Then transfer to a wire rack.
Allow complete cooling before frosting.
Why Cooling Is Important
Warm cakes melt frosting immediately.
This creates sliding layers and messy decoration.
Completely cooled cakes are easier to stack and frost neatly.
Many professional bakers chill cake layers before decorating.
Making the Buttercream Frosting
Step 1 – Beat the Butter
Beat softened butter until creamy and pale.
This usually takes 3 to 4 minutes.
The lighter the butter becomes, the smoother the frosting will be.
Step 2 – Add Powdered Sugar
Add powdered sugar slowly in small portions.
Mix on low speed first to avoid sugar clouds.
After combining, increase speed.
Step 3 – Add Biscoff Spread
Add the Lotus spread.
Pour in vanilla extract.
Add a tiny pinch of salt.
Beat for several minutes until fluffy.
Step 4 – Adjust Consistency
If frosting is too thick:
Add cream one tablespoon at a time.
If frosting is too thin:
Add more powdered sugar.
The perfect buttercream should be:
- Smooth
- Creamy
- Spreadable
- Stable
Cake Assembly
Step 1 – Level the Cakes
If the cake tops are domed, trim slightly using a serrated knife.
Flat layers stack more securely.
Step 2 – Add First Layer
Place first sponge layer onto serving plate.
Spread a thick layer of buttercream.
Drizzle melted Biscoff spread over the frosting.
Add crushed biscuit crumbs if desired.
Step 3 – Add Second Layer
Place second cake layer carefully on top.
Press gently to stabilize.
Step 4 – Crumb Coat
Apply a thin layer of frosting around the entire cake.
This traps loose crumbs.
Chill for 15 to 20 minutes.
Step 5 – Final Frosting Layer
Apply the final thick layer of frosting smoothly.
Use an offset spatula for clean edges.
Rotate the cake while smoothing for a professional appearance.
Decorating the Cake
Decoration transforms the cake into a bakery-style masterpiece.
Biscoff Drip
Warm Biscoff spread slightly until pourable.
Pour gently over the top.
Use a spoon to guide drips down the edges.
Do not overheat the spread.
Overheating makes it too runny.
Biscuit Decoration
Place whole Lotus biscuits around the top edge.
You may also:
- Crush biscuits over the center
- Add biscuit halves vertically
- Arrange crumbs artistically
Optional Decorations
You can decorate with:
- White chocolate curls
- Caramel drizzle
- Whipped cream swirls
- Chocolate shavings
- Mini cookies
Texture of the Finished Cake
The final cake should have:
- Soft sponge layers
- Creamy frosting
- Smooth filling
- Delicate crunch
- Moist interior
- Rich aroma
Each bite should feel balanced rather than overly sweet.
Professional Baking Tips
Use Room Temperature Ingredients
Cold ingredients do not mix properly.
This can create uneven batter.
Measure Correctly
Too much flour creates dryness.
Too little flour weakens structure.
Do Not Rush Cooling
Warm cakes are difficult to decorate neatly.
Chill Between Frosting Layers
This creates sharper edges and cleaner presentation.
Avoid Overmixing
Overmixed batter creates tough texture.
Mix only until ingredients combine.
Common Mistakes and Solutions
Dense Cake
Cause:
Overmixing or too much flour.
Solution:
Measure carefully and mix gently.
Dry Cake
Cause:
Overbaking.
Solution:
Check cake earlier and avoid excessive baking time.
Runny Frosting
Cause:
Warm butter or excessive cream.
Solution:
Chill frosting briefly before using.
Cake Sliding
Cause:
Warm layers or excessive filling.
Solution:
Chill layers before stacking.
Uneven Baking
Cause:
Uneven oven temperature.
Solution:
Rotate pans halfway through baking if necessary.
Storage Instructions
Refrigerator
Store covered in refrigerator for up to 5 days.
Freezer
Wrap unfrosted layers tightly.
Freeze for up to 2 months.
Thaw completely before frosting.
Best Drinks to Serve With Lotus Cake
This cake pairs beautifully with:
- Cappuccino
- Latte
- Black coffee
- Chai tea
- Milk tea
- Hot chocolate
The bitterness of coffee balances the sweet caramel flavor perfectly.
Variations of Lotus Cake
Chocolate Lotus Cake
Add cocoa powder to the sponge.
Chocolate and Biscoff create a rich combination.
Lotus Cheesecake Cake
Add cheesecake filling between layers.
This creates a luxurious dessert hybrid.
Lotus Cupcakes
Use the same batter for cupcakes.
Bake for 18 to 20 minutes.
Lotus Tres Leches Cake
Soak sponge in sweet milk mixture for an ultra-moist version.
Lotus Ice Cream Cake
Combine sponge with frozen layers and whipped cream.
Perfect for summer.
Why This Cake Is So Popular
Lotus Biscoff Cake became globally popular because it combines:
- Cookie flavor
- Caramel flavor
- Creamy frosting
- Elegant presentation
- Café-style appearance
It photographs beautifully and tastes luxurious while remaining approachable.
The flavor appeals to both children and adults.
Final Presentation
A properly made Lotus Biscoff Cake should look:
- Smooth and elegant
- Richly frosted
- Golden caramel in color
- Glossy on top
- Soft when sliced
The aroma should immediately smell buttery and caramelized.
Each layer should remain stable while still soft and moist.
The biscuit topping should add both decoration and texture.